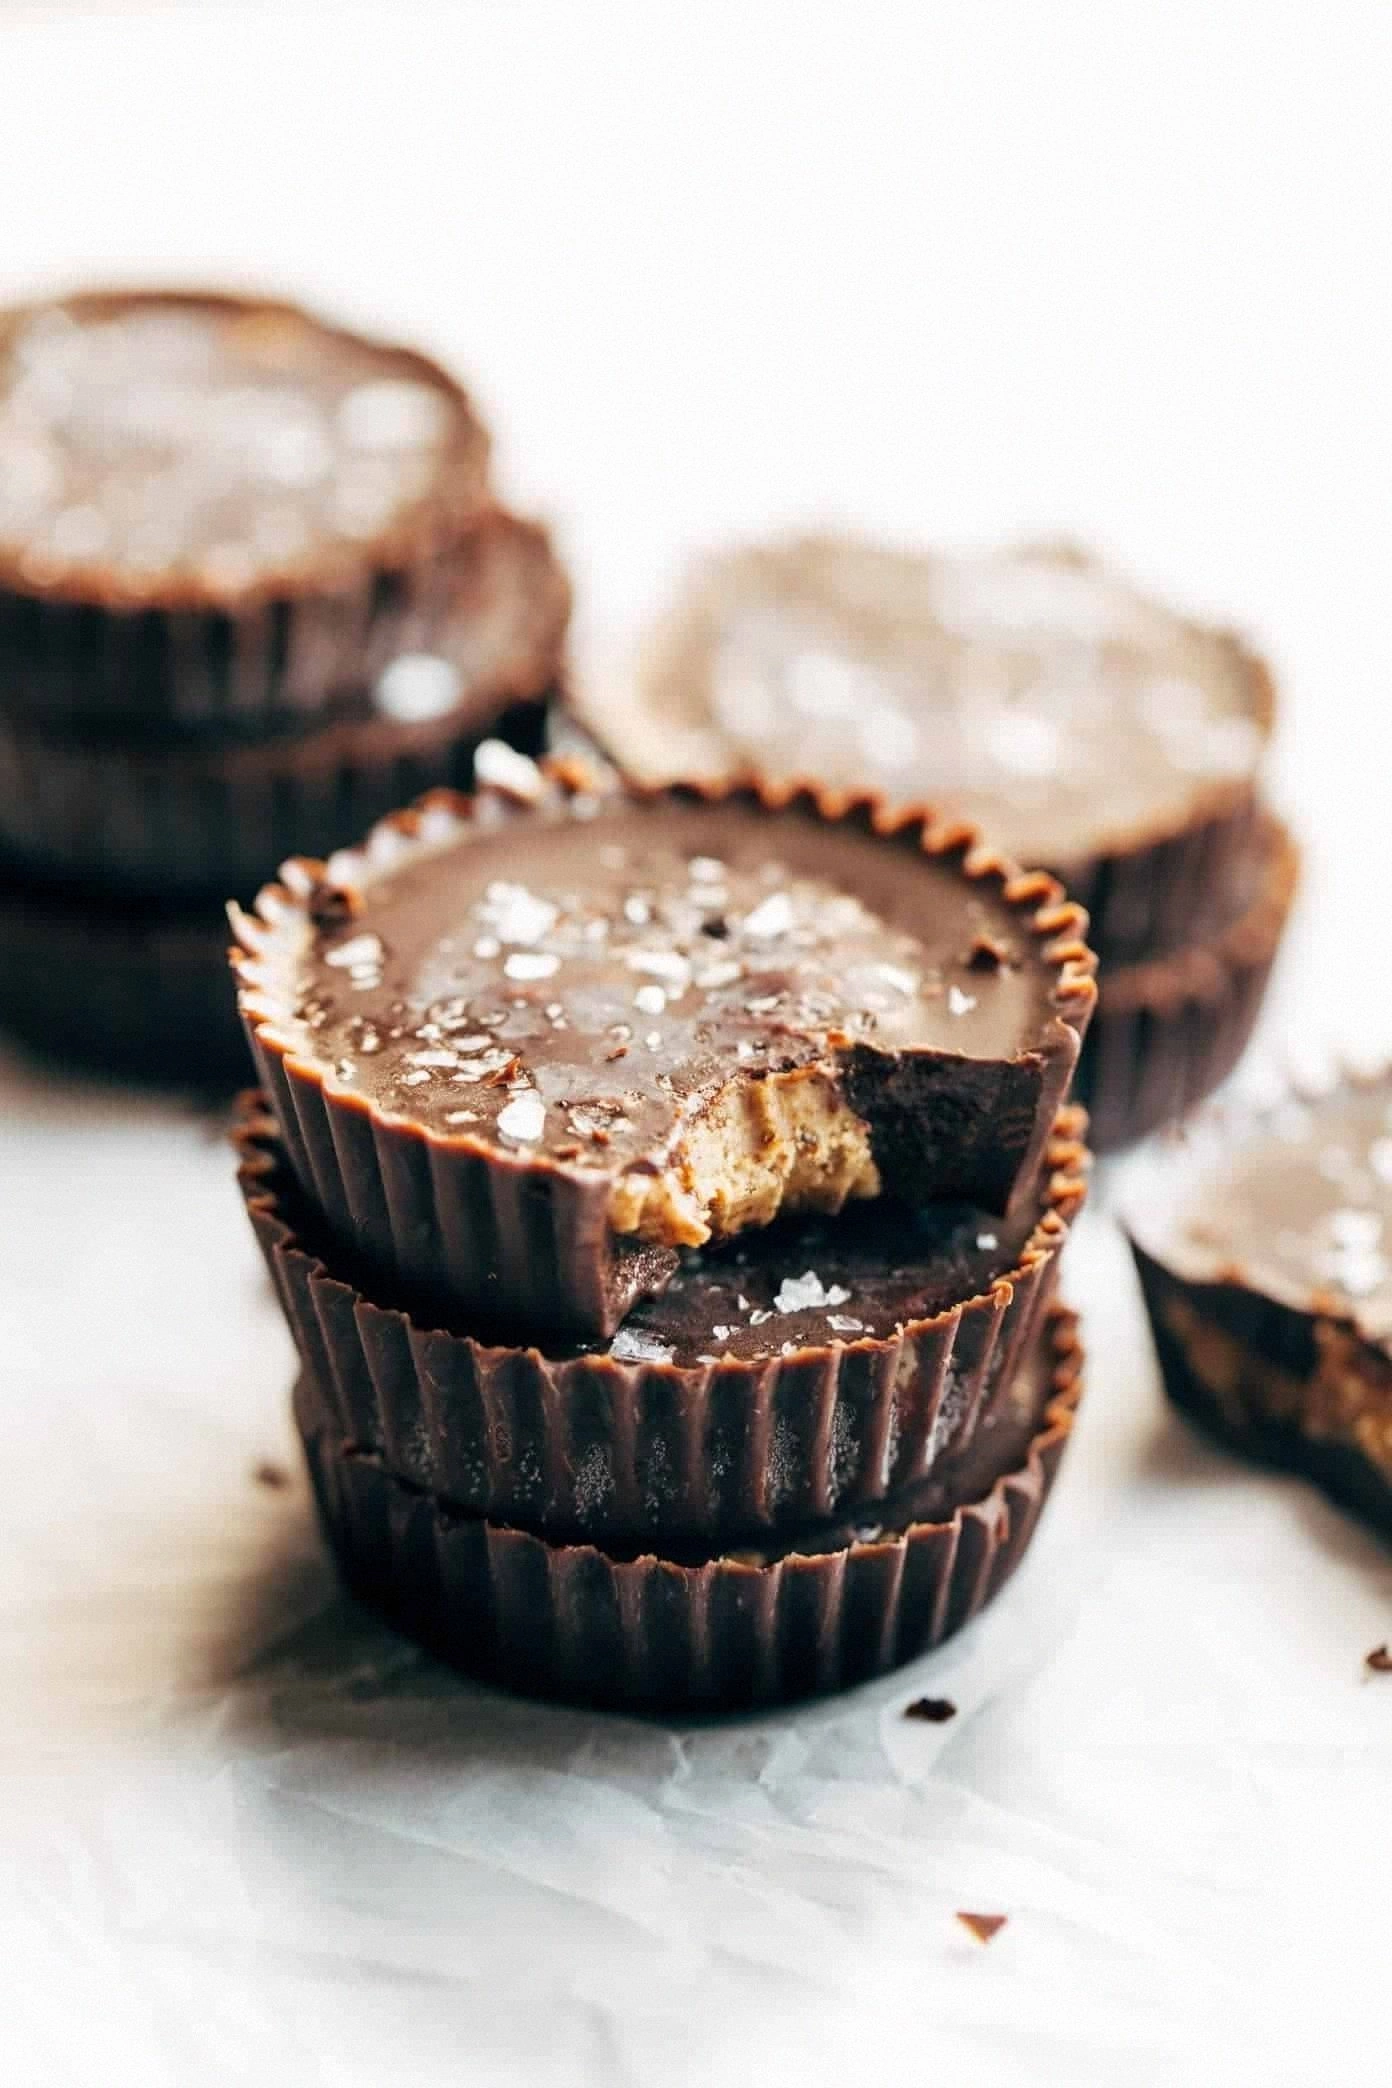
I’ll be honest — I ate half the batch before anyone else got a chance to try it. It started as a late‑night experiment when a friend dared me to turn my pantry staples into something that could rival the candy aisle’s best. I rummaged through the cabinet, grabbed the almond butter, a bar of dark chocolate, a splash of coconut oil, and whispered a promise to the kitchen gods: “I’m about to create the ultimate bite‑size indulgence.” The moment the chocolate hit the pan, a hiss sang like a tiny fireworks show, and I knew this was no ordinary treat.
Picture yourself pulling these from the oven, the whole kitchen smelling like a toasted almond orchard wrapped in midnight cocoa. The glossy tops glisten, the edges have that perfect snap that shatters like thin ice, and the buttery almond core melts in your mouth with the silky smoothness of a well‑kissed lover. The first bite is a surprise party for your palate – a crunchy, salty‑sweet crunch that gives way to a creamy, nutty hug that lingers just long enough to keep you reaching for the next cup. I dare you to taste this and not go back for seconds; I’ve tried, and it’s impossible.
Most recipes get this completely wrong. They either drown the almond butter in chocolate or forget the crucial balance of salt that makes each bite sing. Here’s what actually works: a thin chocolate shell that’s just thick enough to hold the filling, a whisper of sea salt on top, and a touch of honey for that caramel‑kissed finish. The secret ingredient? A dash of vanilla extract that ties the whole symphony together, turning a simple snack into a gourmet experience. And yes, there’s a technique involving a silicone muffin mold that will make your cups look like they belong in a boutique pâtisserie.
Okay, ready for the game‑changer? I’m about to walk you through every single step — by the end, you’ll wonder how you ever made this any other way. From selecting the perfect almond butter to mastering the art of a glossy chocolate coat, we’ll cover it all. Stay with me here — this is worth it, and the results are pure, unadulterated joy in a cup.
What Makes This Version Stand Out
- Flavor Explosion: The combination of roasted almond butter, dark chocolate, and a hint of honey creates a layered taste that evolves with every bite, delivering sweet, salty, and nutty notes in perfect harmony.
- Texture Contrast: A crisp chocolate shell gives way to a luxuriously smooth almond center, offering a satisfying snap followed by a melt‑in‑your‑mouth sensation.
- Simplicity: Only six pantry staples are required, meaning you won’t need a trip to the specialty store to achieve a professional‑grade treat.
- Unique Salt Finish: A light sprinkle of flaky sea salt on each cup amplifies the chocolate’s depth and balances the natural sweetness of the almond butter.
- Crowd‑Pleaser: Whether it’s a kids’ party, a movie night, or a sophisticated dessert platter, these cups disappear in seconds, earning rave reviews every single time.
- Ingredient Quality: Using premium, minimally processed almond butter and high‑cocoa dark chocolate ensures a clean flavor without any off‑notes.
- Method Mastery: The double‑boom technique—pre‑setting a thin chocolate layer, cooling, then adding the filling, and sealing—guarantees a flawless finish every time.
- Make‑Ahead Magic: You can prep the cups up to a week in advance, storing them in the fridge, and they’ll stay perfectly textured and tasty.
Inside the Ingredient List
The Flavor Base
Almond butter is the heart of these cups. Choose a natural, unsweetened variety that boasts a deep, roasted profile; the oil content gives the filling a silky texture that coats the palate like velvet. If you skip the almond butter, you’ll lose that buttery richness and the cups will feel like hollow chocolate shells, which is a sad fate for any dessert. A great tip: stir the almond butter for a minute before measuring to ensure it’s evenly mixed and not separated.
The Texture Crew
Dark chocolate chips provide the shell. Opt for at least 70% cacao for a slightly bitter edge that balances the sweetness of the honey. Using low‑quality chocolate will result in a dull, grainy coating that never truly snaps. If you’re allergic to cocoa, a good quality milk chocolate can be substituted, but expect a sweeter, less complex flavor.
The Unexpected Star
Coconut oil is the secret liaison that creates a glossy, snap‑ready chocolate shell. It lowers the melting point, giving the chocolate a fluid pour and a glossy finish that looks restaurant‑ready. Skipping it will make the chocolate thick and difficult to spread, leading to uneven shells. For a dairy‑free version, stick with refined coconut oil; unrefined adds a coconut flavor that can overwhelm the almond butter.
The Final Flourish
A drizzle of honey (or maple syrup) and a pinch of flaky sea salt complete the flavor orchestra. Honey adds a subtle caramel note that enhances the nutty almond butter, while the salt amplifies the chocolate’s depth. If you’re watching sugar, reduce honey to a tablespoon, but don’t omit it entirely—your cups will feel a bit flat.
Everything's prepped? Good. Let's get into the real action…
The Method — Step by Step
Preheat your oven to a gentle 275°F (135°C). While the oven warms, line a silicone muffin tray with paper liners for extra security. This low heat will gently melt the chocolate without scorching, ensuring a smooth, glossy finish. You’ll hear a faint sizzle as the chocolate meets the heat, a sound that signals everything is on track.
Combine dark chocolate chips and coconut oil in a microwave‑safe bowl. Microwave in 30‑second bursts, stirring between each burst until the mixture is fully melted and glossy. Pro tip: Over‑mixing introduces air bubbles; a gentle stir keeps the surface sleek.
Kitchen Hack: Place the bowl over a pot of simmering water (double boiler) if you’re nervous about microwave hotspots; the gentle heat gives you more control.Spoon a thin layer of melted chocolate into each muffin cup, just enough to coat the bottom and sides. Tilt the tray gently to spread the chocolate evenly. The chocolate should be about 1‑2 mm thick; this thinness is crucial for that perfect snap later. Let the tray sit at room temperature for 5 minutes, then transfer to the freezer for 10 minutes to set the base layer.
While the base sets, whisk together almond butter, honey, vanilla extract, and a pinch of sea salt in a medium bowl until smooth. The mixture should be glossy and pourable—if it feels too thick, add a teaspoon of warm water and stir. This is where the magic happens; the almond butter should coat the back of a spoon like a silky sauce.
Remove the tray from the freezer. Using a small spoon or a piping bag, fill each chocolate shell with about a teaspoon of the almond butter mixture, leaving a small gap at the top for the final chocolate seal. Watch Out: Over‑filling will cause the top layer to spill over, leading to uneven cups.
Watch Out: If the almond butter is too warm, it may melt the base chocolate; keep the filling cool by chilling it briefly before adding.Re‑heat the remaining chocolate‑oil mixture if it has thickened. Spoon a second generous layer over each cup, completely covering the almond butter filling. Tap the tray lightly on the counter to release any air bubbles; you’ll see them pop up to the surface like tiny fireworks.
Return the tray to the freezer for another 15 minutes, allowing the top layer to harden. Once set, sprinkle a pinch of flaky sea salt over each cup for that final flavor pop. The salt should sit just on the surface, not dissolve into the chocolate.
Kitchen Hack: Use a fine-mesh sieve to dust the salt evenly; this prevents clumps and ensures each bite gets that perfect salty kiss.Finally, pop the silicone tray out of the freezer and gently lift each cup with a thin spatula. Transfer them to a parchment‑lined plate and let them sit at room temperature for 10 minutes before serving. This short rest lets the chocolate finish its final set, giving you that glossy, snap‑ready surface.
That’s it — you did it. But hold on, I’ve got a few more tricks that'll take this to another level. Stay tuned for insider tips that will make every batch better than the last.
Insider Tricks for Flawless Results
The Temperature Rule Nobody Follows
Chocolate is a fickle beast; keep it between 86°F and 90°F (30‑32°C) when melting. If it overheats, the cocoa butter separates, leaving a dull, grainy finish. Use a digital thermometer and pause the heat the moment you hit 90°F, stirring constantly. This tiny discipline makes the shell shine like a polished gemstone.
Why Your Nose Knows Best
Before you pour the second chocolate layer, trust the scent. When the chocolate smells toasty and releases a faint caramel note, you know it’s at the perfect stage. If it still smells raw, give it a few extra seconds; if it smells burnt, you’ve gone too far. Your nose is the ultimate thermometer.
The 5‑Minute Rest That Changes Everything
After the final freeze, let the cups rest at room temperature for exactly five minutes. This short pause lets the chocolate contract slightly, making it easier to pop out of the silicone mold without cracking. Skipping this step is the reason many home cooks end up with broken cups.
Seal the Deal with a Light Tap
Once you’ve added the top chocolate layer, give the tray a gentle tap on the counter. This releases trapped air bubbles that would otherwise create unsightly pockets. A quick tap also smooths the surface, ensuring a flawless finish.
Cold‑Water Steam Rescue
If you notice a cup’s edge pulling away from the mold, run a warm (not hot) water rinse over the exterior of the silicone tray for a few seconds. The steam relaxes the chocolate just enough to settle back into the mold, preventing premature cracking.
Creative Twists and Variations
This recipe is a playground. Here are some of my favorite ways to switch things up:
Salted Caramel Almond Cups
Swap the honey for a swirl of homemade caramel and finish with a sprinkle of fleur de sel. The caramel adds a buttery depth that pairs beautifully with the almond butter, while the fleur de sel delivers a sophisticated crunch.
Matcha‑Infused Chocolate Shell
Add a teaspoon of culinary‑grade matcha powder to the melted chocolate before coating. The earthy green hue offers a subtle tea‑like bitterness that balances the sweet almond filling, creating a visual and flavor contrast.
Spicy Chili Chocolate Cups
Incorporate a pinch of cayenne pepper into the chocolate layer for a gentle heat that tingles the tongue. The spice awakens the chocolate’s natural fruit notes and makes the cups perfect for adventurous snackers.
Coconut‑Lime Twist
Stir in shredded toasted coconut and a dash of lime zest into the almond butter filling. The citrus brightens the nutty base, while the coconut adds a tropical chew that transports you to a beachside café.
White Chocolate & Raspberry Drizzle
Replace the dark chocolate with high‑quality white chocolate for a milder shell, then drizzle raspberry coulis over the finished cups. The tart raspberry cuts through the sweetness, delivering a balanced bite that feels luxurious.
Storing and Bringing It Back to Life
Fridge Storage
Place the cups in an airtight container and store them in the refrigerator for up to 7 days. The cool environment keeps the chocolate firm and the almond butter fresh, preserving that perfect snap‑and‑creamy experience.
Freezer Friendly
For longer keeping, arrange the cups on a parchment‑lined tray and freeze them individually for 2‑3 hours before transferring to a zip‑top bag. They’ll stay delicious for up to 3 months. When you’re ready to indulge, move them to the fridge for an hour to temper before serving.
Best Reheating Method
To revive a chilled cup, place it on a microwave‑safe plate, add a tiny splash (about a teaspoon) of water to the plate, and microwave on low for 10‑15 seconds. The steam generated gently melts the chocolate back to that glossy, melt‑in‑your‑mouth texture without overcooking the almond butter.