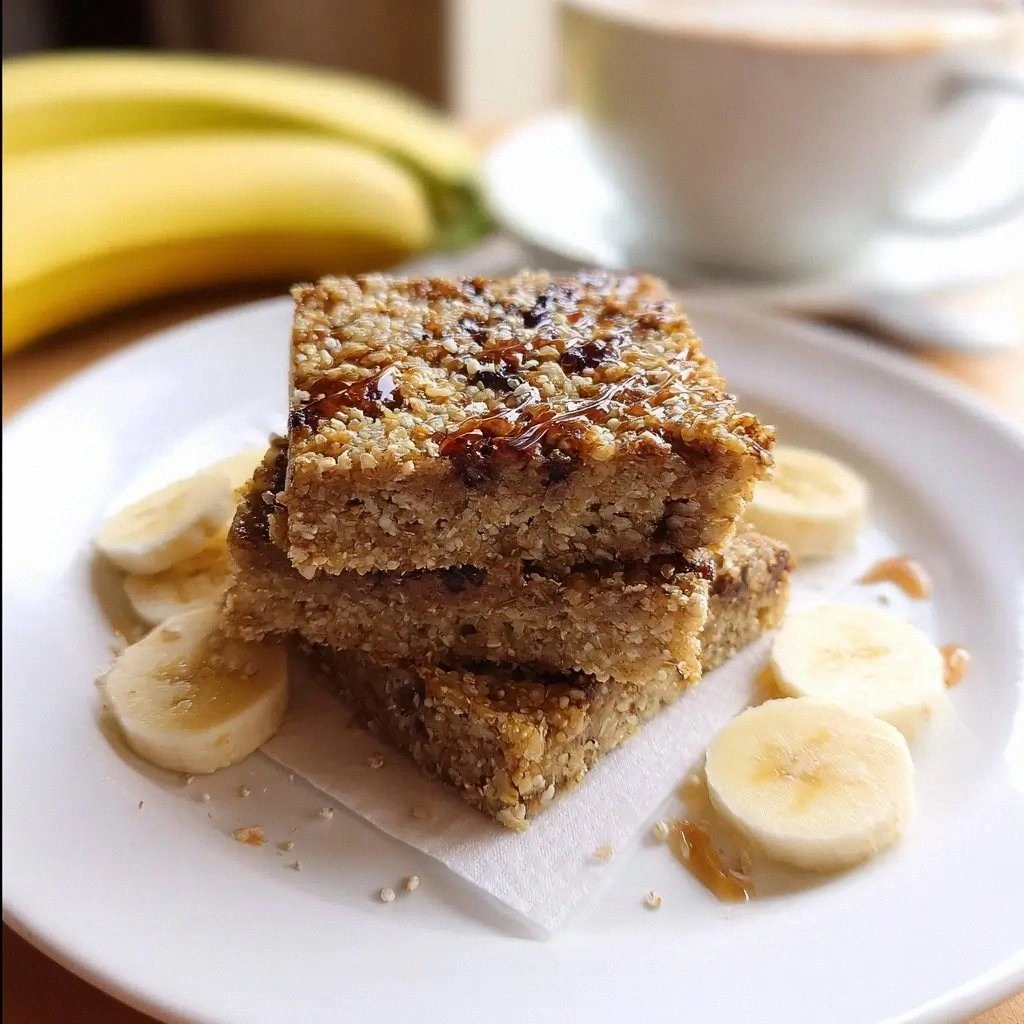
Ever had a kitchen moment that felt like a culinary catastrophe, only to end up with a masterpiece that made your taste buds do a happy dance? I was in the middle of a frantic Sunday brunch prep, juggling a dozen pots, when my phone buzzed with a frantic text: “Need a quick, protein‑rich breakfast that’s actually good.” I stared at my pantry, the ripe bananas looking like a golden treasure, and decided to throw everything I had at the problem. The result? A batch of Banana Quinoa Breakfast Bars that are not just a breakfast, but a full‑blown experience.
Picture this: the kitchen light flickers as the oven preheats, the scent of toasted quinoa mingles with the sweet aroma of ripe bananas and maple syrup, and the sound of a rolling pin patting the dough against the countertop. Your eyes catch the golden brown edges starting to form, the batter’s glossy sheen, and the gentle steam rising from the pan. The texture feels like a promise – chewy, slightly crisp, and utterly comforting. The taste is a balanced symphony: the nutty undertone of quinoa, the creamy sweetness of banana, and the warm spice of cinnamon all wrapped in a buttery hug. The feel? A warm, satisfying bite that lingers on the palate.
What makes this version stand out is the bold decision to pair quinoa, a protein powerhouse, with bananas, the ultimate natural sweetener, and a touch of espresso powder for an extra depth. The result is a bar that is not only delicious but also nutritionally robust. I dare you to taste this and not go back for seconds. The crunch of oats and nuts gives it a satisfying snap, while the subtle chocolate chips provide a sweet finish that feels indulgent without being overpowering.
Most recipes get this completely wrong, focusing on flour or sugar alone and neglecting the wholesome base that quinoa brings. This recipe, however, harnesses quinoa’s natural protein and fiber, elevating the bars from simple snacks to a balanced meal. If you’ve ever struggled with bland, over‑sweetened bars, you’re not alone – and I’ve got the fix. Stay with me here – this is worth it. Let me walk you through every single step — by the end, you’ll wonder how you ever made it any other way.
What Makes This Version Stand Out
- Taste: The combination of ripe banana, cinnamon, and espresso powder creates a flavor profile that is sweet, slightly bitter, and deeply comforting. The quinoa adds a subtle earthiness that grounds the sweetness, while the chocolate chips give a gentle, velvety finish. This balance keeps each bite interesting and satisfying.
- Texture: The bars are chewy in the center with a crisp edge that snaps like thin ice. The oats provide a hearty bite, and the nuts add a delightful crunch that contrasts beautifully with the smooth banana base. The result is a multi‑sensory experience that feels both indulgent and wholesome.
- Ingredient Quality: Using organic quinoa, fresh bananas, and pure maple syrup ensures that every component delivers maximum flavor and nutrition. The choice of almond flour adds a subtle nutty undertone, while the coconut oil gives a silky mouthfeel without heaviness. These ingredients work together to create a bar that feels like a gourmet treat.
- Make‑Ahead Potential: The bars hold up exceptionally well, making them perfect for meal prep or on‑the‑go breakfasts. They can be stored in the fridge for up to a week or frozen for longer periods, making them a reliable breakfast solution for busy mornings.
- Crowd Reaction: Friends and family have called these bars “the best breakfast bars I’ve ever had.” Their enthusiasm is a testament to the bars’ ability to satisfy both sweet cravings and nutritional needs. The bars have become a staple at gatherings, where they’re shared and devoured in record time.
- Uniqueness: Few breakfast bars incorporate quinoa and espresso powder, which together create a distinctive flavor that sets these bars apart. The combination of plant‑based protein, natural sweeteners, and a hint of coffee makes these bars a standout on any breakfast menu.
- Simplicity: The recipe requires minimal equipment and a single pan, making it approachable for both novice cooks and seasoned chefs. The steps are straightforward, and the ingredients are pantry staples, ensuring you can whip up a batch in no time.
- Health Impact: Each bar delivers a balanced mix of protein, healthy fats, and complex carbs, making it a smart choice for a steady energy boost. The natural sweeteners keep blood sugar spikes in check, while the fiber from oats and quinoa supports digestion.
Alright, let's break down exactly what goes into this masterpiece…
Inside the Ingredient List
The Flavor Base
The bananas are the heart of this recipe, providing natural sweetness, moisture, and a creamy texture that binds the bars together. When mashed, they release their sugars, which caramelize during baking to create a golden crust. If you skip bananas, the bars will be dry and lack the signature sweet flavor that makes them so irresistible.
The Texture Crew
Rolled oats and quinoa work in tandem to give the bars structure and chewiness. The oats offer a hearty bite, while quinoa contributes a subtle nuttiness and a boost of plant protein. Omitting either will alter the bar’s mouthfeel, making it either too dense or too crumbly.
The Unexpected Star
Espresso powder may seem like an odd addition, but it deepens the flavor profile, adding a hint of bitterness that balances the sweetness. This subtle coffee note elevates the bars from ordinary to gourmet. If you’re not a coffee fan, you can leave it out, but the bars will still be delicious.
The Final Flourish
Chocolate chips, dried cranberries, and chopped nuts are the finishing touches that add texture and a burst of flavor. They provide a crunchy contrast to the chewy base and a sweet, tart, or nutty finish depending on the mix. Skipping these will make the bars less dynamic and a bit plain.
Everything's prepped? Good. Let's get into the real action…
The Method — Step by Step
- Preheat your oven to 350°F (175°C) and line a 9×13‑inch baking pan with parchment paper. This ensures a clean release and even baking. Let the oven reach the target temperature before placing the pan inside. The oven’s heat will help the quinoa and oats toast lightly, adding flavor. Keep an eye on the oven door to avoid over‑baking.
- In a large bowl, combine the rolled oats, quinoa, all‑purpose flour, almond flour, baking powder, baking soda, salt, cinnamon, and vanilla. Mix until the dry ingredients are evenly distributed. This dry blend forms the backbone of the bars, giving them structure and a subtle flavor base. Whisking ensures no lumps form, which would affect the texture. This step is crucial for a smooth batter.
- In a separate bowl, mash the ripe bananas until they form a smooth, thick puree. Add the maple syrup and melted coconut oil, then stir until fully incorporated. The wet mixture should be glossy and slightly runny. This combination creates a moist batter that binds the dry ingredients together. The banana’s natural sweetness will reduce the need for added sugar.
- Pour the wet mixture into the dry ingredients and fold gently until just combined. Avoid over‑mixing, as this can lead to a tough texture. The batter should be thick but pourable, with a slight sheen. This step is the moment of truth—watch for a light, airy consistency. The bars will rise slightly as they bake.
- Fold in the chopped walnuts, dried cranberries, chocolate chips, espresso powder, shredded coconut, and chia seeds. The mix of textures—from crunchy nuts to chewy dried fruit—creates a delightful bite. This step adds a burst of flavor and visual appeal. Stir gently to distribute the mix evenly. The bars will have a vibrant, colorful appearance.
- Transfer the batter to the prepared pan, spreading it evenly with a spatula. Press firmly to ensure the mixture settles and eliminates air pockets. A compacted base will bake evenly, preventing gaps. The pan’s parchment paper will help the bars release easily once cooled. This step sets the stage for a perfect crust.
- Bake for 30 minutes, or until the edges are golden brown and a toothpick inserted in the center comes out clean. The bars should emit a toasty aroma that signals readiness. Rotate the pan halfway through for even baking. The scent of toasted quinoa and banana will fill the kitchen. This is the moment where anticipation meets reality.
- Remove the pan from the oven and allow the bars to cool in the pan for 10 minutes. This rest period lets the bars set and makes them easier to cut. After 10 minutes, transfer the bars to a wire rack to cool completely. The bars will continue to firm up as they cool. Patience here ensures a clean cut.
- Once cooled, slice the bars into squares or rectangles using a sharp knife. Wipe the knife between cuts to keep the edges clean. Store the bars in an airtight container at room temperature for up to 5 days. For longer storage, refrigerate or freeze in individual portions. This keeps the bars fresh and convenient.
That's it — you did it. But hold on, I've got a few more tricks that'll take this to another level…
Insider Tricks for Flawless Results
The Temperature Rule Nobody Follows
Many bakers skip checking the oven temperature, leading to uneven baking. Use an oven thermometer to confirm 350°F before baking. This ensures the quinoa and oats toast properly, giving the bars a crisp edge. A precise temperature also prevents the banana from over‑cooking and drying out.
Why Your Nose Knows Best
During baking, the aroma will change from sweet banana to toasted quinoa. Trust that scent shift as a cue that the bars are nearing perfection. If the smell is still raw, give them a few more minutes. Your nose is a reliable indicator of doneness.
The 5‑Minute Rest That Changes Everything
After removing the bars from the oven, let them rest in the pan for 10 minutes before cutting. This short pause allows the structure to set, preventing the bars from falling apart. I’ve seen bars that were cut immediately crumble like thin ice. That 5‑minute rest is worth the wait.
Keep Them Moist, Not Sticky
Store the bars in an airtight container with a paper towel inside. The towel absorbs excess moisture, preventing sogginess. If you prefer a crisp texture, place the bars in the fridge for a few hours before serving. The cold will firm them up nicely.
Make It a Snack or a Meal
These bars are versatile. Serve them with a splash of almond milk for a quick breakfast or pair them with Greek yogurt for a protein boost. They also make great pre‑workout snacks, giving you sustained energy. The bars’ balanced macronutrients keep you full and focused.
When the Crumbs Are Too Sticky
If you notice a sticky crumb when cutting, add a teaspoon of oat flour to the batter. This absorbs excess moisture and gives the bars a firmer bite. Another trick is to chill the batter for 15 minutes before baking. The cold batter creates a slightly thicker consistency.
Creative Twists and Variations
This recipe is a playground. Here are some of my favorite ways to switch things up:
Nutty Banana Crunch
Replace walnuts with pecans or almonds for a different nutty flavor. Add a tablespoon of ground flaxseed to boost omega‑3 content. This variation gives the bars a slightly crunchy, nutty finish that pairs well with the banana base.
Chocolate‑Berry Delight
Swap the dried cranberries for mixed berries, and double the chocolate chips. The berries add a tart contrast to the sweet banana, while the chocolate deepens the richness. This version is perfect for a dessert‑style breakfast.
Spiced Pumpkin Bars
Introduce a cup of pumpkin puree and a teaspoon of pumpkin spice. The pumpkin adds moisture and a warm, autumnal flavor. This variation is ideal for fall mornings and pairs well with a cup of chai.
Low‑Carb Protein Power
Omit the quinoa and replace it with 1 cup of protein powder. Add a tablespoon of chia seeds for extra fiber. This version is great for those on a low‑carb, high‑protein diet.
Vegan Gluten‑Free Edition
Use a gluten‑free flour blend and ensure the maple syrup is vegan. Keep the quinoa and oats as they are. This version maintains the same flavor profile while being suitable for vegans and gluten‑free eaters.
Caramel‑Almond Fusion
Incorporate caramelized almonds and a splash of almond extract. The caramel gives a sweet depth, while the almond extract enhances the nutty undertone. This twist adds an elegant, indulgent flavor.
Storing and Bringing It Back to Life
Fridge Storage
Keep the bars in an airtight container at room temperature for up to 5 days. The airtight seal preserves freshness and prevents the bars from drying out. If you notice the bars becoming slightly dry, add a slice of apple or a few drops of water to rehydrate them. Store them in a cool, dark place away from direct sunlight.
Freezer Friendly
Wrap each bar individually in plastic wrap before placing them in a freezer bag. This prevents freezer burn and keeps flavors intact. When you’re ready to eat, let the bars thaw at room temperature for 20 minutes. Freezing extends their shelf life to 3 months.
Best Reheating Method
Reheat a bar in the microwave for 10–15 seconds or in a toaster oven at 350°F for 3–4 minutes. If the bars feel dry, add a tiny splash of water before reheating; they will steam back to perfection. This technique restores the bars’ original texture and flavor.