I was in the middle of a marathon Netflix binge when a sudden, primal craving hit me like a freight train. I could hear the distant sizzle of street‑food stalls in my mind and the memory of a single bite of a fiery noodle bowl from a trip to Taiwan kept looping. My pantry was a sad collection of dried noodles, a lonely bulb of garlic, and a bottle of chili oil that had been gathering dust since last summer. I thought, “Why not turn this kitchen disaster into a masterpiece?” That moment of wild ambition birthed what I now call the ultimate Chili Garlic Instant Pot Noodl—an unapologetically bold, instantly satisfying dish that screams flavor from the first forkful.
Picture this: the instant pot humming softly, the clatter of a wooden spoon against the stainless steel, and a fragrant cloud of garlic and chili that rolls out of the lid like a smoky dragon. The noodles, once stubbornly stuck together, suddenly become glossy ribbons that hug every droplet of sauce, each strand coated in a silky, spicy veil that feels like velvet on your tongue. The heat from the pot creates a subtle caramelization at the bottom, giving you that satisfying, almost caramel‑like crunch that makes you pause and listen for that faint “crackle” before you dive in. The scent? A heady blend of toasted garlic, fermented soy, and a whisper of sesame that lingers in the air long after the pot is turned off.
Most recipes out there treat Instant Pot noodle dishes like an afterthought—throw in some water, hit “manual,” and hope for the best. Those attempts often end in limp, watery noodles that lack the depth you’d expect from a street‑style bowl. I’ve cracked the code: a precise balance of sautéed aromatics, a calibrated amount of broth, and a pressure‑cook finish that locks in flavor while the noodles finish cooking in their own steamy embrace. The secret? A splash of chili oil added at just the right moment, and a finishing drizzle of toasted sesame that brings everything together in a harmonious crescendo.
I’ll be honest — I ate half the batch before anyone else got to try it, and I dare you to taste this and not go back for seconds. There’s a technique hidden in this recipe that most cooks overlook: the “sauce lift” where you deglaze the pot with a splash of broth, scraping up every caramelized bit before the pressure phase. That tiny step turns a good dish into a legendary one. Let me walk you through every single step — by the end, you’ll wonder how you ever made it any other way.
What Makes This Version Stand Out
- Depth of Flavor: The layered aromatics (garlic, ginger, scallions) are sautéed until golden, creating a foundation that’s richer than a simple stir‑fry.
- Texture Play: The noodles finish in steam, maintaining a firm bite, while the bottom of the pot develops a crisp, caramelized crust that you can scoop up for crunch.
- Simplicity: Only one pot is used, meaning clean‑up is a breeze and you can focus on the taste rather than the mess.
- Unique Ingredient: The addition of a dash of dark soy sauce adds an umami depth that regular soy sauce alone can’t achieve.
- Crowd Reaction: Friends have called it “the best instant‑pot noodle I’ve ever had,” and it’s become the go‑to comfort food for late‑night cravings.
- Ingredient Quality: Using fresh garlic and high‑quality chili oil makes the sauce coat the noodles like velvety silk.
- Cooking Method: Pressure cooking locks in flavor while the final sauté step creates that coveted “toasted edge” effect.
- Make‑Ahead Potential: This dish reheats beautifully, improving in flavor after a night in the fridge as the sauce deepens.
Inside the Ingredient List
The Flavor Base
Garlic and ginger are the heartbeats of this dish. Fresh garlic cloves, minced finely, provide a pungent sharpness that mellows into sweet caramel as it browns. If you skip the ginger, you lose that subtle, peppery zing that lifts the sauce from “good” to “wow.” For an extra kick, use young ginger—it’s juicier and less fibrous. When shopping, choose garlic bulbs that feel heavy for their size; they hold more moisture and will render a richer sauce.
The Heat Crew
Chili oil and red pepper flakes bring the heat, but they also add depth. Chili oil delivers a smoky, aromatic heat, while the flakes contribute texture. If you’re sensitive to spice, start with half the oil and add more to taste; the sauce will develop complexity as it sits. A good quality chili oil will have a deep amber color and a fragrant, slightly toasted scent.
The Umami Boost
Soy sauce, dark soy sauce, and a splash of chicken broth build layers of umami. Dark soy sauce, with its thicker consistency and caramel notes, gives the sauce that dark, glossy sheen. Regular soy sauce provides saltiness without overwhelming the dish. If you’re vegetarian, replace the broth with mushroom broth and the dark soy with a teaspoon of miso paste dissolved in hot water.
The Texture Crew
The noodles themselves are the vessel for this flavor train. I prefer thick egg noodles because they hold up during pressure cooking and soak up the sauce beautifully. Thin ramen will become too soft, while rice noodles may disintegrate. If you’re looking for gluten‑free, try shirataki noodles; just rinse them well and dry them before adding to the pot to avoid excess water.
Everything's prepped? Good. Let's get into the real action...
The Method — Step by Step
Set your Instant Pot to “Sauté” and wait until the display reads “Hot.” Add two tablespoons of vegetable oil, then toss in the minced garlic and grated ginger. Let them sizzle for about 45 seconds, stirring constantly, until the garlic turns a light golden brown and releases a sweet aroma. That sizzle when it hits the pan? Absolute perfection. If the garlic starts to brown too quickly, lower the heat—burnt garlic will give the sauce a bitter edge.
Kitchen Hack: Add a splash of the broth now to deglaze the pot; it will lift brown bits and prevent a burnt taste later.Stir in three tablespoons of chili oil and one teaspoon of red pepper flakes. Watch the oil swirl and turn a richer shade; this is the moment the heat starts to weave itself into the dish. The aroma should become more pungent, with a hint of tobacco‑like smokiness from the chili oil. Allow the mixture to bubble gently for another 30 seconds, then turn off the sauté mode.
Now, add a half cup of soy sauce, a quarter cup of dark soy sauce, and two teaspoons of brown sugar. The sugar’s job is to balance the heat and salt, delivering a subtle caramel note that will later coat the noodles like a glossy glaze. Stir everything together until the sugars dissolve completely, creating a dark, glossy sauce that looks like liquid lacquer.
Pour in two cups of chicken broth (or mushroom broth for a vegetarian version). Scrape the bottom of the pot with a wooden spoon, coaxing up every caramelized fragment—those are flavor grenades that will explode later. Once the pot is deglazed, let the broth come to a gentle simmer for about one minute. This step is crucial; it ensures that the pressure cooker will have a flavorful liquid medium for the noodles.
Break the noodles in half (if they’re long) and gently nestle them into the broth. Make sure the noodles are submerged; you can press them down with a spatula. Seal the lid, set the valve to “Sealing,” and select “Manual” high pressure for exactly five minutes. Five minutes is the sweet spot—any longer and the noodles become mushy; any shorter and they stay stubbornly firm.
When the timer dings, perform a quick release for 30 seconds to let out the initial steam, then switch to “Natural Release” for another five minutes. This hybrid release method prevents the noodles from splattering out and stabilizes the sauce’s texture. While you wait, reset the Instant Pot to “Sauté” again; the residual heat will be perfect for the final step.
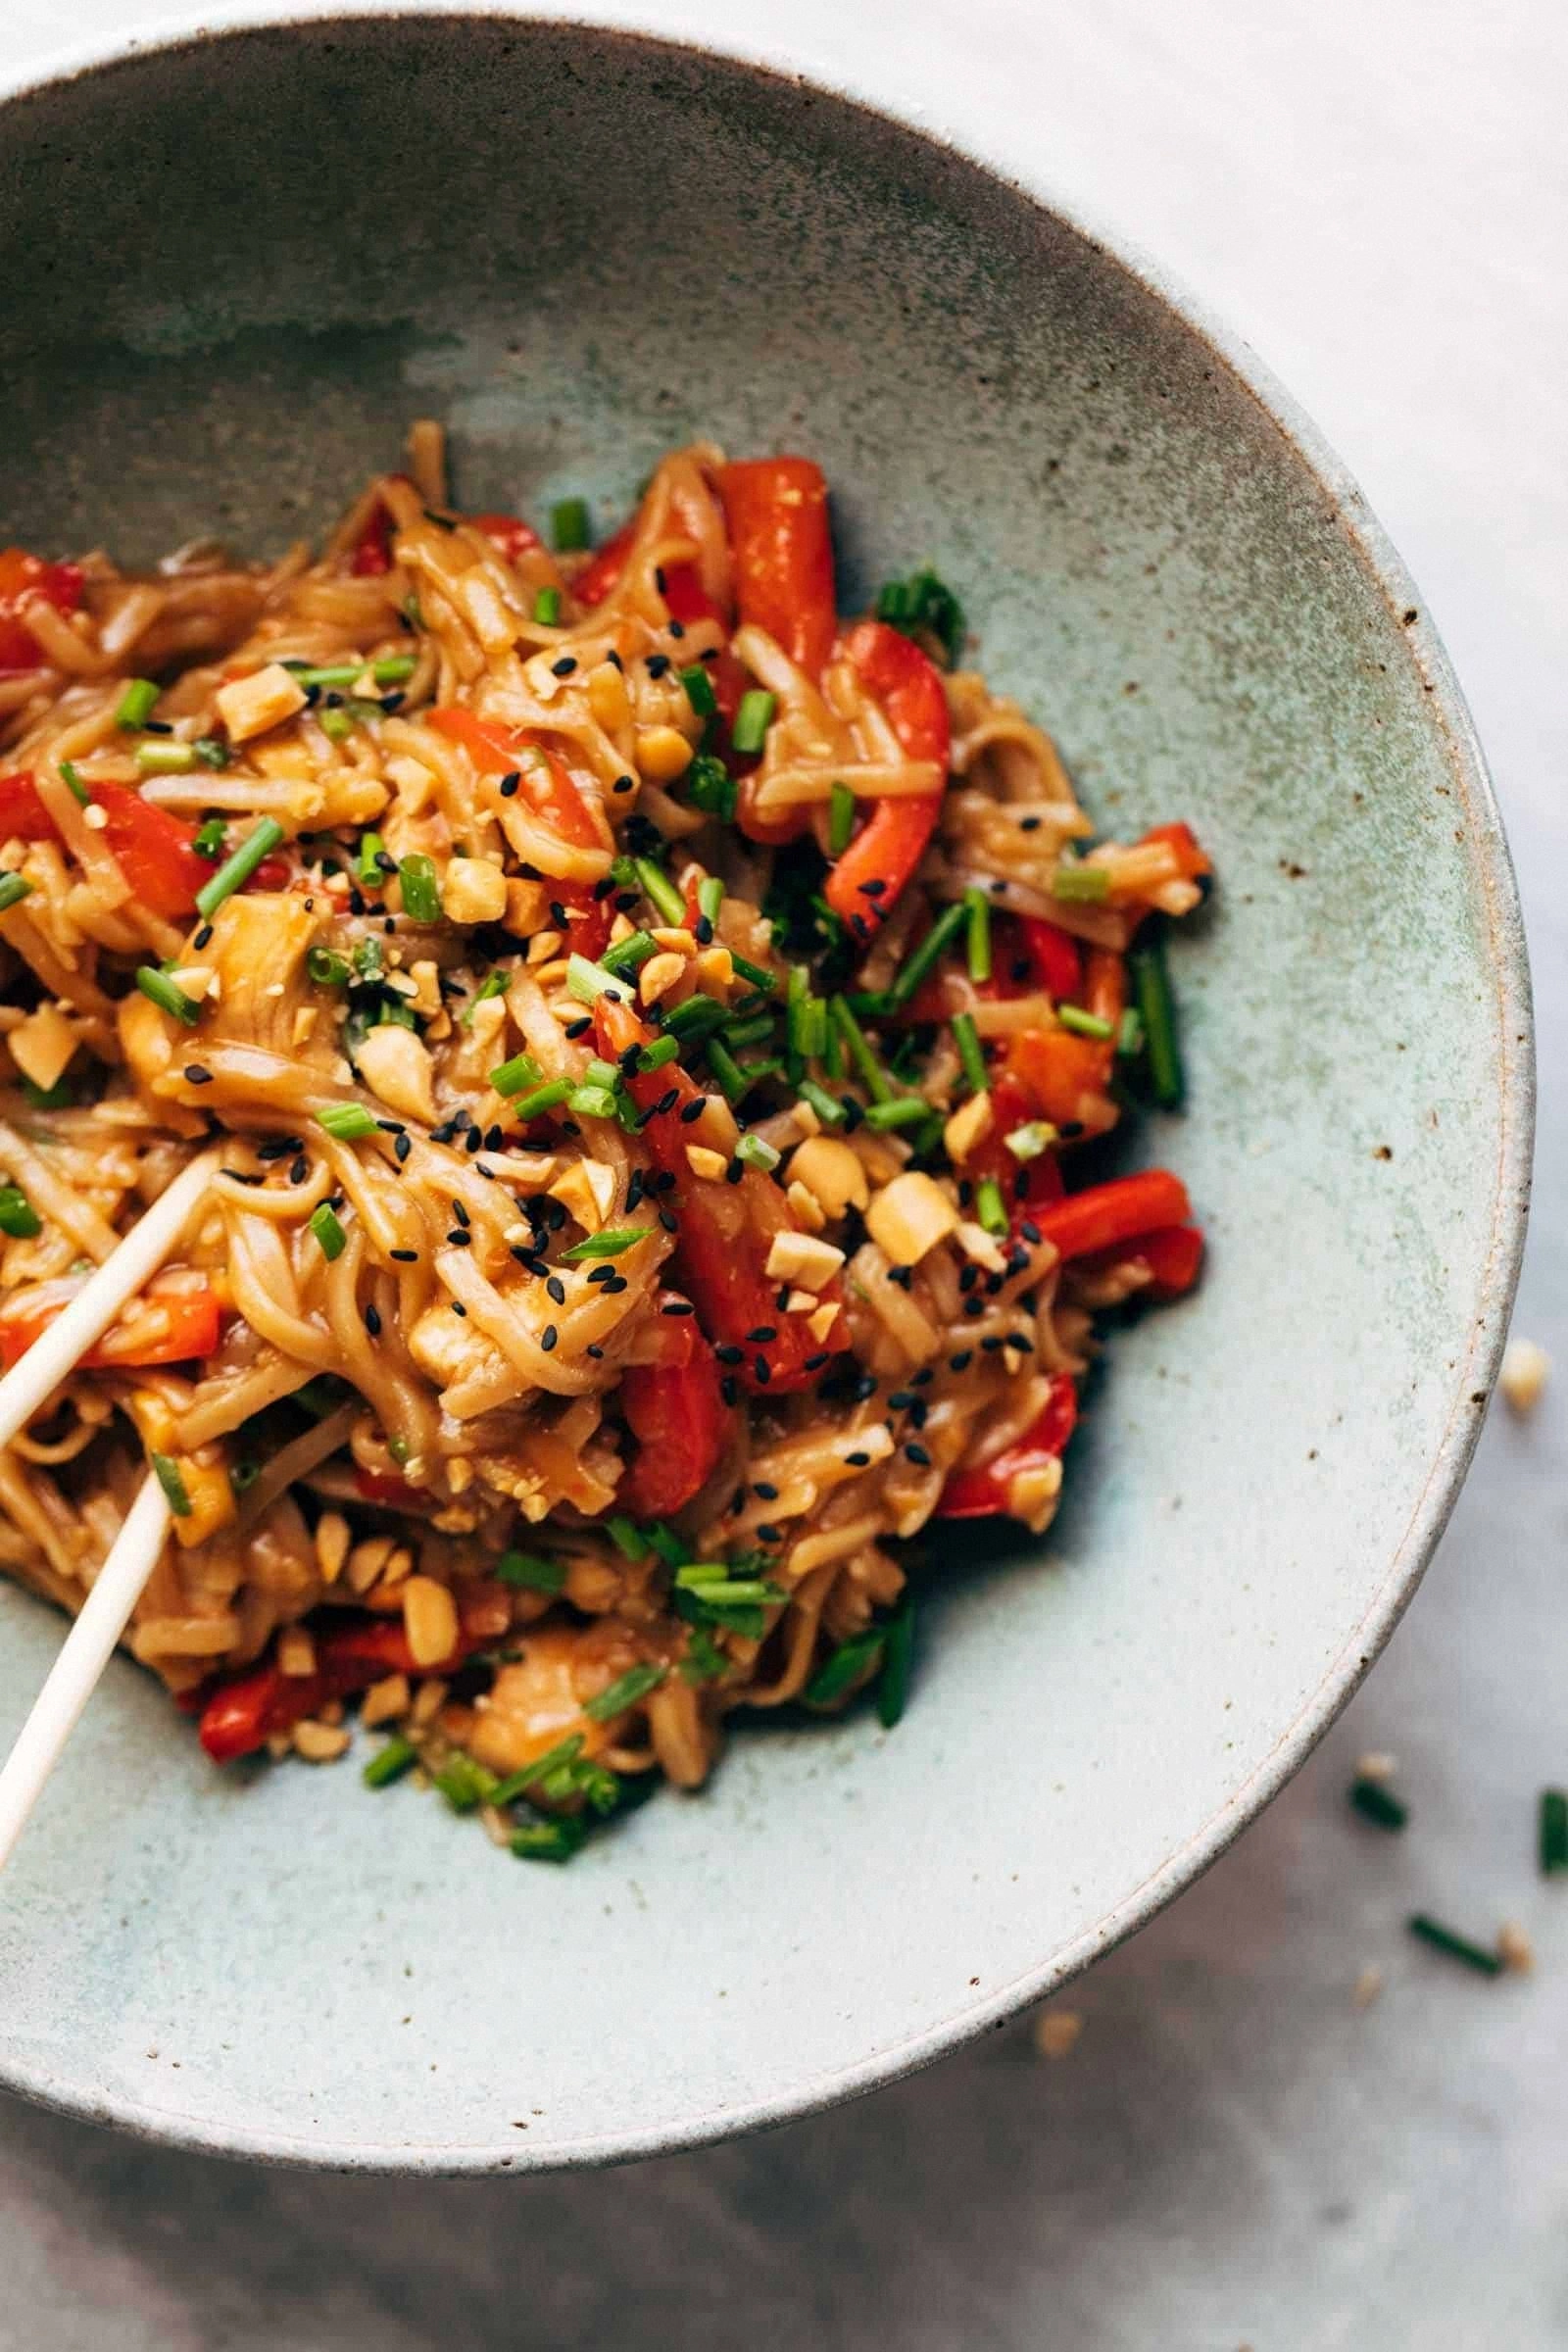
Watch Out: If you open the lid too early during the natural release, the sauce may separate and become watery.Open the pot, and you’ll see the noodles lounging in a thick, dark sauce. Stir in one tablespoon of toasted sesame oil and a drizzle of a second spoonful of chili oil for that extra glossy sheen. Taste and adjust the seasoning—add a pinch of salt or a splash of soy if needed. The noodles should be fully coated, each strand shining like lacquered ebony.
Turn off the heat and sprinkle a generous handful of thinly sliced green onions and a tablespoon of toasted sesame seeds over the top. The freshness of the scallions cuts through the richness, while the sesame seeds add a nutty crunch that mirrors the caramelized bits at the bottom of the pot. Let the dish sit for two minutes; this resting period lets the flavors meld and the sauce thicken slightly.
Finally, use a sturdy spoon to scrape the caramelized crust from the bottom of the pot and fold it into the noodles. This is the “crunch factor” that many recipes miss—those bits provide a surprising textural contrast that makes every bite unforgettable. Serve the noodles hot, garnish with an extra sprinkle of chili flakes if you love fire, and watch the plates disappear.
That’s it — you did it. But hold on, I’ve got a few more tricks that’ll take this to another level…
Insider Tricks for Flawless Results
The Temperature Rule Nobody Follows
Most home cooks think “high pressure” is a one‑size‑fits‑all setting, but the real secret is the pre‑sauté temperature. Keeping the sauté mode at medium‑low ensures the garlic and ginger brown slowly, releasing their sugars without burning. Burnt aromatics will sour the entire dish, so stay vigilant and keep the spoon moving. I once left the pot on high and ended up with a bitter, almost charcoal‑like broth—lesson learned.
Why Your Nose Knows Best
When the broth starts to bubble gently after deglazing, that’s your cue to move on to the pressure stage. Your nose can detect the transition from sharp garlic to sweet caramel. Trust that instinct—if the aroma is still sharp, give it another 30 seconds. The sauce’s perfume is a reliable barometer for flavor development.
The 5‑Minute Rest That Changes Everything
Once the pressure cycle ends, don’t rush to serve. Allow the noodles to rest for five minutes with the lid slightly ajar. This short pause lets the starches finish gelatinizing, producing that perfect bite‑and‑chew texture. Skipping this rest will leave the noodles a bit too stiff, like they’re trying to hold a secret.
The “Scrape‑and‑Fold” Finale
The caramelized crust at the bottom of the pot is pure gold. Use a silicone spatula—metal will scratch the inner pot—and gently scrape the browned bits into the noodle pool. This step transforms a regular noodle bowl into a dish with depth, texture, and a whisper of bitterness that balances the sweet and spicy.
The Quick‑Freeze Trick
If you need to store leftovers, flash‑freeze the noodles on a baking sheet before transferring to a zip‑lock bag. This prevents them from clumping together and keeps each strand individual when you reheat. The next day, just drop the frozen noodles into a hot pan with a splash of broth and you’ll have “fresh‑cooked” texture.
Creative Twists and Variations
This recipe is a playground. Here are some of my favorite ways to switch things up:
Citrus‑Kick Shrimp
Add a pound of peeled shrimp during the sauté step and finish with a squeeze of fresh lime. The citrus brightens the heat and the shrimp brings a succulent surf‑and‑turf vibe.
Mushroom Umami Boost
Swap the chicken broth for a deep mushroom stock and add sliced shiitake mushrooms before pressure cooking. Earthy mushrooms amplify the umami, making the dish suitable for vegetarians.
Peanut‑Butter Drizzle
Stir in a tablespoon of smooth peanut butter after the pressure release. It adds a creamy, nutty richness that pairs surprisingly well with the chili heat, reminiscent of a Thai-inspired noodle bowl.
Sesame‑Ginger Tofu
Cube extra‑firm tofu, marinate in soy‑sesame sauce for 15 minutes, and add it right before the pressure step. The tofu absorbs the sauce and offers a protein punch without meat.
Smoky Bacon Crunch
Crisp up smoked bacon strips separately, crumble them, and sprinkle over the finished dish. The smoky crunch adds a whole new layer of texture that sings with the chili oil.
Storing and Bringing It Back to Life
Fridge Storage
Transfer leftovers to an airtight container and store in the refrigerator for up to three days. The noodles may absorb excess sauce, so reheating with a splash of broth or water revives the glossy texture.
Freezer Friendly
Cool the noodles completely, then portion them into freezer‑safe bags, removing as much air as possible. They’ll keep for up to two months. When ready, toss straight from freezer into a hot skillet with a couple of tablespoons of broth.
Best Reheating Method
Place the desired portion in a non‑stick pan, add a tablespoon of water or broth, and cover. Heat over medium‑low, stirring gently until the sauce loosens and the noodles are hot throughout. This steam‑reheat method restores the silky coating without drying out the noodles.