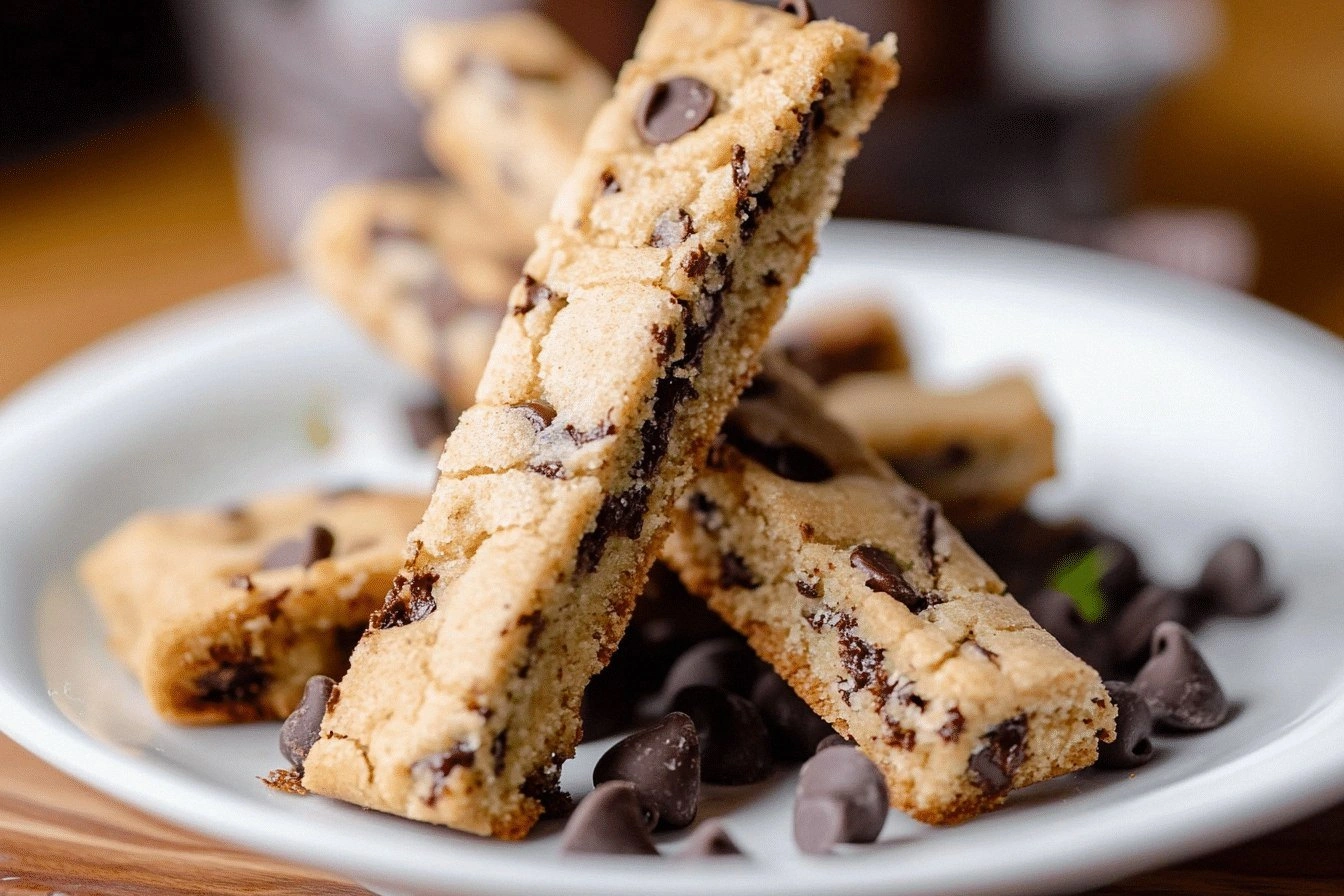
I was standing in the middle of a kitchen that had more chaos than a toddler’s birthday party, when the idea struck me: “What if I could turn my stale cookie dough into a crunchy, chocolate‑filled stick that would make the whole house smell like a bakery?” I had tried every cookie recipe I could find—soft, chewy, brittle, chewy again—and each time I was left with either a flat, greasy mess or a batch that crumbled like a bad joke. The moment that changed everything was a single bite of a cookie that was crisp on the outside, chewy in the middle, and had pockets of molten chocolate that danced on the tongue. That bite was the spark that led me to craft the ultimate version of the humble chocolate chip cookie, but in stick form, with a crunch that shatters like thin ice and a melt‑in‑your‑mouth center that refuses to settle. If you’ve ever stared at a batch of cookie dough that looks like a lump of dough, thinking “I can do better,” then you’re in the right place. I dare you to taste this and not go back for seconds. This is hands down the best version you'll ever make at home. Let me walk you through every single step — by the end, you'll wonder how you ever made it any other way.
What Makes This Version Stand Out
- Texture: The dough is engineered to spread just enough for a crisp edge while retaining a chewy core. The secret is a balanced ratio of butter to flour, and a touch of brown sugar that keeps the sticks from drying out. When you bite, you hear that satisfying crack and feel the chocolate pockets explode.
- Flavor: It’s not just chocolate and butter. A dash of sea salt amplifies the chocolate’s depth, and vanilla extract gives a warm, aromatic finish that lingers. The result is a flavor profile that feels indulgent without being cloying.
- Simplicity: No fancy equipment or obscure ingredients. Just pantry staples that most households already own. The method is straightforward, with clear temperature cues and visual checkpoints.
- Make‑ahead: You can bake a batch and keep it in the fridge for up to a week, or freeze the dough for later. The sticks hold up well, maintaining their crispness and chocolate centers.
- Crowd‑pleaser: These sticks are the perfect snack for parties, movie nights, or a quick afternoon treat. They’re bite‑size, shareable, and the crunch factor gets everyone talking.
- Ingredient Quality: Using high‑quality semi‑sweet chips and real butter makes a world of difference. The chocolate melts beautifully, and the butter adds a silky richness that you can’t get from margarine.
- Cooking Method: Baking at a slightly higher temperature creates a golden‑brown crust in the first minutes, while the interior stays soft. This two‑stage bake ensures the sticks never become too hard or too gooey.
- Future Pacing: Picture yourself pulling these out of the oven, the whole kitchen smelling incredible, the sticks sizzling as they cool, and the anticipation of that first bite. You’ll be the hero of the snack table.
Inside the Ingredient List
The Flavor Base
All-purpose flour is the silent hero that gives the sticks structure and a tender crumb. It’s the backbone that holds the chocolate and butter together, preventing the dough from becoming too dense. If you use cake flour instead, the sticks will be overly soft and fragile. For the best result, choose a standard 00 flour or a blend that’s slightly heavier than cake flour.
The Texture Crew
Unsalted butter is the cornerstone of richness. When melted, it coats every grain of flour, creating a barrier that locks in moisture. The butter’s melting point is critical; if it’s too hot, the dough spreads too much, resulting in thin, brittle sticks. Keep the butter at room temperature so it’s soft but not greasy.
The Unexpected Star
Semi-sweet chocolate chips are more than just chocolate; they’re a flavor engine that releases cocoa butter during baking. The chips’ size and coating affect how they melt—larger chips hold their shape longer, while smaller ones create a more even melt. If you prefer a darker chocolate, swap in dark chocolate chunks for a richer bite. A pinch of sea salt on top before baking elevates the chocolate’s sweetness.
The Final Flourish
Granulated sugar provides the crispness you crave, while brown sugar adds depth and moisture. The combination creates a caramelized exterior that’s slightly chewy yet crisp. Vanilla extract brings a warm, aromatic note that balances the sweetness. Baking soda is the leavening agent that helps the sticks rise just enough to achieve a golden edge.
Everything’s prepped? Good. Let’s get into the real action.
The Method — Step by Step
- Step 1: Preheat and Prep. Set your oven to 375°F (190°C) and line a baking sheet with parchment paper. This temperature is high enough to crisp the edges quickly while keeping the center tender. While the oven warms, bring the butter to room temperature so it’s soft but not melted.
- Step 2: Mix Dry Ingredients. In a bowl, whisk together the flour, baking soda, and salt. This ensures even distribution of leavening and prevents clumping. A good rule of thumb: sift the flour if you’re prone to lumps. The dry mix should feel like fine sand.
- Step 3: Cream Butter and Sugars. In a separate bowl, beat the butter until pale and fluffy. Add both granulated and brown sugars, then continue beating until the mixture is light and airy. This process incorporates air, giving the sticks a subtle lift. Kitchen Hack: Use an electric mixer on medium speed for 3 minutes; this guarantees a uniform texture.
- Step 4: Add Vanilla and Egg. Stir in the vanilla extract and then beat in the egg until fully blended. The egg binds the dough and adds moisture. Be careful not to overbeat; you want a smooth consistency, not a stiff batter.
- Step 5: Combine Wet and Dry. Gradually fold the dry mix into the wet mixture, stirring until just incorporated. The dough should be thick but pliable. Watch Out: Overmixing can develop gluten, making the sticks tough. The dough should feel like a thick cookie dough that can be rolled without tearing.
- Step 6: Fold in Chocolate Chips. Gently fold the chips into the dough, ensuring they’re evenly distributed. The chips should be fully coated, preventing them from sinking to the bottom. A few extra chips on top will give a glossy finish.
- Step 7: Roll and Cut. On a lightly floured surface, roll the dough into a rectangle about 1/4 inch thick. Cut into 1/2-inch strips, then cut each strip into 2-inch sticks. The sticks should be uniform so they bake evenly.
- Step 8: Bake. Place the sticks on the prepared sheet, spacing them 2 inches apart. Bake for 12–14 minutes, or until the edges are golden and the centers are set but still slightly soft. The first few minutes will create a crisp crust, while the interior remains chewy.
- Step 9: Cool. Remove the sheet from the oven and let the sticks rest for 5 minutes on the tray. Then transfer them to a wire rack to cool completely. Cooling on a rack prevents the bottoms from becoming soggy.
- Step 10: Serve. Once cooled, arrange the sticks on a platter or pack them in a container for take‑away. The sticks will stay fresh for 2 days at room temperature or up to a week in the fridge.
Insider Tricks for Flawless Results
The Temperature Rule Nobody Follows
Oven temperature is king. While most cookie recipes call for 350°F, this stick recipe thrives at 375°F, giving a golden crust without overcooking the interior. If your oven runs hot, lower the temperature by 10°F. A calibrated thermometer can save you from a batch of burnt sticks.
Why Your Nose Knows Best
A quick test: When the sticks are baking, the aroma should be buttery, sweet, and slightly chocolatey, with a faint hint of vanilla. If the smell is too sweet, the dough is overmixed or has too much sugar. The scent is your best gauge of doneness.
The 5-Minute Rest That Changes Everything
After rolling, let the dough rest for 5 minutes before cutting. This rest allows the butter to firm up, preventing the dough from spreading unevenly. It also helps the chocolate chips settle, so they don’t sink to the bottom during baking. A short pause can make a huge difference in texture.
The Secret of Even Spacing
Spacing the sticks 2 inches apart on the sheet ensures even heat distribution. If you crowd them, they’ll steam and lose that coveted crunch. A simple way to remember this is to use a piece of parchment as a ruler.
The Chill Trick for Crispness
Chilling the dough for 20–30 minutes before rolling firms the butter, giving the sticks a crisp edge that’s almost buttery in texture. The dough will be easier to handle and less likely to tear. This step is optional but highly recommended for the best results.
The One-Ingredient Upgrade
Swap out 1 cup of butter for an equal amount of coconut oil for a subtle tropical twist. The coconut oil will give the sticks a slightly nutty flavor and a firmer bite. The trick works best when the dough is chilled first.
The Final Finish
Just before baking, sprinkle a pinch of sea salt on each stick. The salt enhances the chocolate’s flavor and balances the sweetness. It also creates a subtle crunch on the surface, adding an extra layer of texture.
Creative Twists and Variations
This recipe is a playground. Here are some of my favorite ways to switch things up:
Nutty Crunch
Add 1/2 cup chopped pecans or walnuts to the dough. The nuts provide a satisfying crunch and a nutty aroma that pairs well with the chocolate. Toast the nuts beforehand for an extra burst of flavor.
Almond Joy
Replace half the chocolate chips with toasted almond pieces and add 1 tablespoon of coconut flakes. The coconut adds a sweet, tropical note while the almonds give a chewy texture. This version is perfect for a beach‑themed gathering.
Minty Fresh
Stir in 1 teaspoon of peppermint extract and a handful of crushed mint chocolate bars. The mint flavor cuts through the sweetness, creating a refreshing bite. Serve chilled for a cool treat on a hot day.
Spiced Delight
Add 1/2 teaspoon of ground cinnamon and a pinch of cayenne pepper to the dough. The cinnamon adds warmth while the cayenne gives a subtle kick. This variation is great for autumn gatherings.
Caramel Swirl
Caramel Swirl
Fold in a swirl of caramel sauce before baking. The caramel will melt into pockets of gooey sweetness, creating a decadent treat. Use a spoon to swirl the caramel into the dough for a marbled effect.
Sea Salt Caramel
After baking, drizzle a thin layer of sea salt caramel over the sticks. The caramel will set into a glossy glaze, while the sea salt adds a savory contrast. This final touch turns the sticks into a gourmet snack.
Chocolate‑Dipped
Dip the cooled sticks in melted dark chocolate, then sprinkle with crushed pretzels. The chocolate coating gives a glossy finish, while the pretzels add a salty crunch. Chill them until the chocolate hardens for an instant upgrade.
Storing and Bringing It Back to Life
Fridge Storage
Keep the sticks in an airtight container at room temperature for up to 3 days. The airtight seal prevents moisture from getting in, preserving the crispness. If you notice any softness, reheat them briefly in a 350°F oven for 2 minutes.
Freezer Friendly
Wrap the sticks individually in parchment paper and place them in a freezer bag. They’ll stay fresh for up to 3 months. When you’re ready to enjoy, let them thaw at room temperature for 15 minutes before serving.
Best Reheating Method
To revive their crunch, preheat your oven to 350°F and bake the sticks for 3–4 minutes. For a quick fix, microwave on low power for 10–15 seconds, but watch closely to avoid melting the chocolate. Adding a tiny splash of water before reheating steams the surface, helping the sticks regain their original texture.