Picture this: I’m in the middle of a frantic Sunday morning, juggling a bag of groceries, a toddler who insists on wearing a tutu, and a stubborn oven that refuses to preheat. I open the pantry, stare at the bland list of ingredients, and suddenly the craving hits me like a bolt of lightning—apple, yogurt, and the comforting promise of a sweet, fluffy cake that feels like a hug in a bowl. I know I’m about to create something that will make the whole house smell like a freshly baked apple orchard, and I’m not going to keep this secret to myself.
I’ve spent the last week experimenting with gluten‑free flours, trying to find that elusive balance between fluffiness and chew. I discovered that mixing a touch of cornstarch with the all‑purpose blend gives the batter the lightness of a cloud while keeping it structurally sound. The apples are diced just so—firm, peeled, and tossed in a sprinkle of cinnamon to give them a subtle heat that lingers on the palate. The yogurt is thick and plain, the perfect base that adds tang without overpowering the sweetness. The moment the batter hits the pan, the aroma rises like a gentle sunrise, promising warmth and comfort.
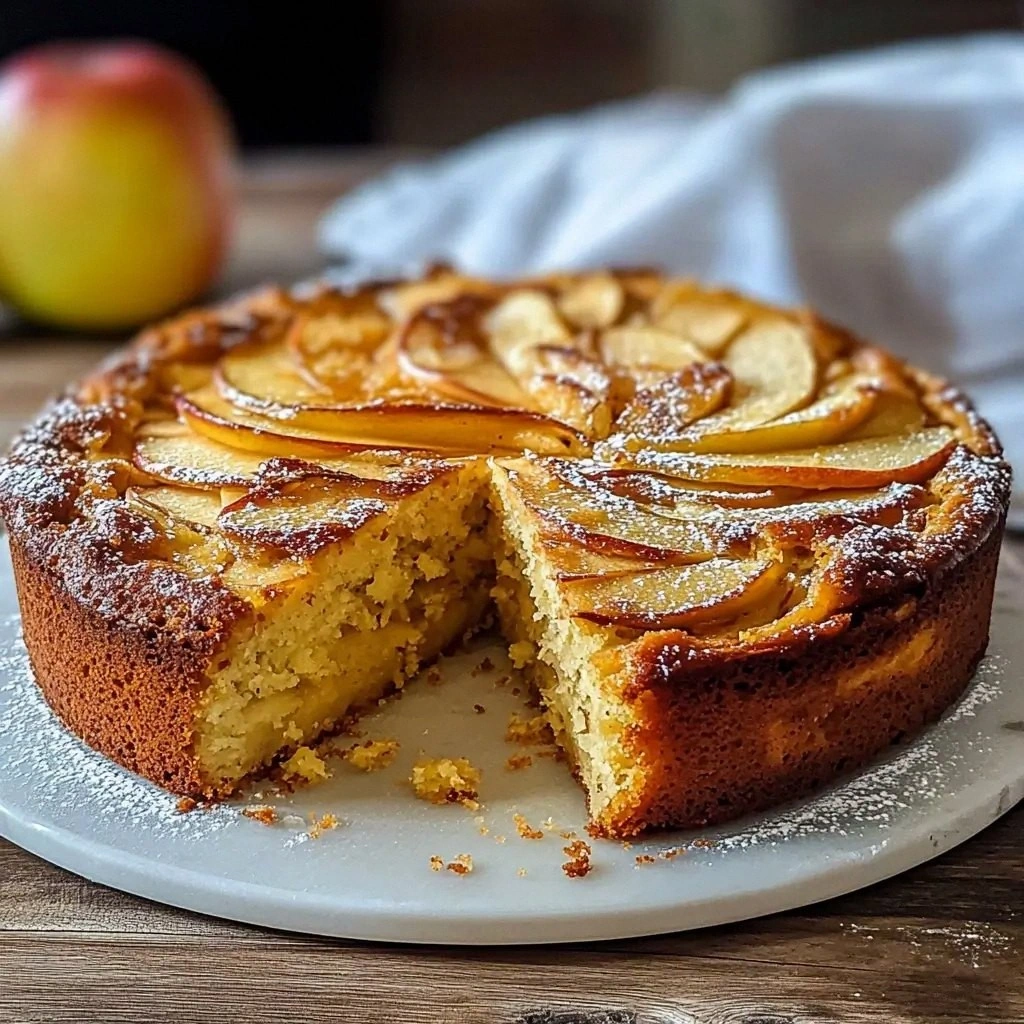
What makes this version of the breakfast apple yo stand out is the intentional layering of flavors and textures. The apples don’t just sit in the batter; they caramelize slightly as the cake bakes, creating pockets of sweet, juicy bursts. The yogurt brings a creamy silkiness that melts into the crumb, while the butter adds a glossy finish that makes the top look like a golden sunrise. The addition of raisins and walnuts adds a delightful crunch and a nutty undertone that balances the apple’s sweetness. The result is a cake that feels both indulgent and wholesome, a breakfast that can transition into a dessert with equal grace.
Now, I dare you to taste this and not go back for seconds. I’ve been told that the first bite will make you question every other breakfast cake you’ve ever made. If you’ve ever struggled with gluten‑free baking, you’re not alone, and I’ve got the fix. Picture yourself pulling this out of the oven, the whole kitchen smelling incredible, and a plate of golden, fragrant cake waiting to be devoured. Let me walk you through every single step — by the end, you’ll wonder how you ever made it any other way.
What Makes This Version Stand Out
- Taste: The sweet and tart balance of apples, yogurt, and honey creates a flavor profile that is both comforting and refreshing. The subtle spice from cinnamon and lemon zest adds depth without overpowering the main ingredients.
- Texture: The batter’s airy consistency, achieved through the blend of gluten‑free flour and cornstarch, results in a cake that is soft yet holds its shape. The caramelized apple pockets provide a pleasant contrast to the tender crumb.
- Simplicity: Every ingredient you need is pantry‑friendly and easy to source, making this recipe a quick and stress‑free breakfast option.
- Uniqueness: The combination of yogurt and butter in a gluten‑free cake is rare, giving this recipe a signature richness that sets it apart from other apple cakes.
- Crowd Reaction: Friends who’ve tried this say it’s “the best version you’ll ever make at home.” Even skeptics of gluten‑free baking are converted.
- Make‑Ahead Potential: The cake keeps well for up to four days in the fridge, and can be frozen for longer storage, making it perfect for busy mornings.
Inside the Ingredient List
The Flavor Base
At the heart of this cake lies the combination of gluten‑free all‑purpose flour and cornstarch. The flour provides structure, while the cornstarch lightens the batter, preventing a heavy crumb that can be common in gluten‑free recipes. Without this balance, the cake would feel dense and rubbery. If you skip the cornstarch, you’ll notice a heavier bite and a slightly denser finish.
The Texture Crew
Greek yogurt is the secret to a moist, tender crumb. Its thick consistency coats the batter, creating a silk‑like mouthfeel that melts in your mouth. The melted butter adds a glossy sheen and a subtle buttery flavor that elevates the entire cake. Skipping butter will leave the cake dry and less flavorful.
The Unexpected Star
Raisins are more than just dried grapes; they bring a chewy sweetness that contrasts beautifully with the crisp apple chunks. If you’re watching sugar intake, you can replace raisins with chopped dates or omit them entirely. The raisins’ natural sugars caramelize during baking, adding depth to the flavor profile.
The Final Flourish
Lemon zest and lemon juice add a bright, citrusy lift that cuts through the richness of the cake. They also enhance the apple’s natural sweetness, creating a harmonious balance. If you prefer a less tart cake, reduce the lemon juice to one tablespoon.
Everything’s prepped? Good. Let’s get into the real action.
The Method — Step by Step
- Preheat your oven to 350°F (175°C). Line a 9-inch round cake pan with parchment or grease it lightly with butter. The preheated oven ensures a uniform bake, preventing the edges from drying out while the center remains moist.
- In a large mixing bowl, whisk together the gluten‑free flour, cornstarch, baking powder, baking soda, salt, and cinnamon. Sift the dry ingredients to avoid clumps, which can lead to uneven texture. This dry blend is the backbone of the cake’s structure.
- In a separate bowl, combine the applesauce, Greek yogurt, honey, melted butter, lemon zest, lemon juice, and vanilla extract. Whisk until the mixture is smooth and glossy. The wet blend’s richness will coat each dry particle, ensuring a cohesive batter.
- Pour the wet mixture into the dry mixture, stirring gently with a spatula. Be careful not to overmix; a few streaks are fine. Overmixing can activate gluten‑free proteins, leading to a tougher crumb.
- Fold in the diced apples, raisins, walnuts, and shredded coconut. The apples should be evenly distributed so each slice contains a burst of fruit. The nuts add a satisfying crunch that contrasts with the soft cake.
- Pour the batter into the prepared pan, smoothing the top with a spatula. Tap the pan lightly on the counter to release air bubbles, which can cause uneven rises.
- Bake for 30–35 minutes, or until a toothpick inserted into the center comes out clean. The cake should have a golden crust that feels firm to the touch. If you’re unsure, let it cool for a few minutes before testing.
- Remove from the oven and let it cool in the pan for 10 minutes, then transfer to a wire rack to cool completely. This step allows the steam to escape, preventing the cake from becoming soggy.
- Once cooled, slice and serve with a dollop of Greek yogurt or a drizzle of honey. The finish is a sweet, tangy crescendo that lingers on the tongue.
That’s it — you did it. But hold on, I’ve got a few more tricks that will take this to another level.
Insider Tricks for Flawless Results
The Temperature Rule Nobody Follows
Many bakers bake at a high temperature to get a quick rise, but that can cause the edges to brown before the center cooks. Keep the oven at 350°F (175°C) and let the cake rise slowly. This slow rise gives the batter time to expand evenly, ensuring a fluffy interior.
Why Your Nose Knows Best
As the cake bakes, the aroma will change from sweet to nutty to slightly caramelized. Trust that scent; it means the sugars are caramelizing just right. If the smell is too sweet, you’re probably overbaking.
The 5-Minute Rest That Changes Everything
Let the cake rest for five minutes after removing it from the oven. The heat continues to cook the interior, and the rest allows the steam to settle, preventing a soggy bottom.
How to Keep It Moist Longer
After cooling, brush the top lightly with a mixture of honey and lemon juice. This glaze adds a glossy finish and locks in moisture, keeping the cake soft for days.
Serving Size Adjustments
For a lighter option, cut the cake into smaller squares and serve with a dollop of low‑fat yogurt. The tang will cut through the richness without adding extra calories.
Creative Twists and Variations
This recipe is a playground. Here are some of my favorite ways to switch things up:
Spiced Pumpkin Yo
Replace apples with pumpkin puree and add a pinch of nutmeg and allspice. The result is a fall‑seasoned cake that’s both sweet and warm.
Chocolate Chip Delight
Fold in a cup of dairy‑free chocolate chips and reduce the honey by half. The chocolate adds a decadent layer that pairs beautifully with the yogurt.
Berry Burst Variation
Swap the apples for diced strawberries or blueberries and sprinkle a teaspoon of fresh thyme. The herb adds a surprising herbal note.
Almond Flour Upgrade
Use almond flour instead of gluten‑free all‑purpose flour for a nutty flavor and a slightly denser crumb. This variation is great for those who love a richer texture.
Maple‑Infused Yo
Replace honey with pure maple syrup and add a splash of maple extract. The maple flavor deepens the sweetness and gives the cake a distinct autumnal vibe.
Vegan Version
Use a plant‑based yogurt, flax eggs, and coconut oil instead of butter. The cake remains fluffy, but with a lighter, vegan profile.
Storing and Bringing It Back to Life
Fridge Storage
Wrap the cooled cake tightly in plastic wrap and store it in an airtight container for up to four days. The yogurt’s acidity helps preserve freshness, but keep it refrigerated to maintain moisture.
Freezer Friendly
Slice the cake and place the pieces on a parchment‑lined tray. Freeze until solid, then transfer to a freezer bag. The cake stays good for up to three months. Thaw overnight in the fridge before serving.
Best Reheating Method
Reheat a slice in the microwave for 20–25 seconds, then finish it in a skillet over medium heat with a splash of water. The water steams the cake, restoring its softness and preventing it from drying out.