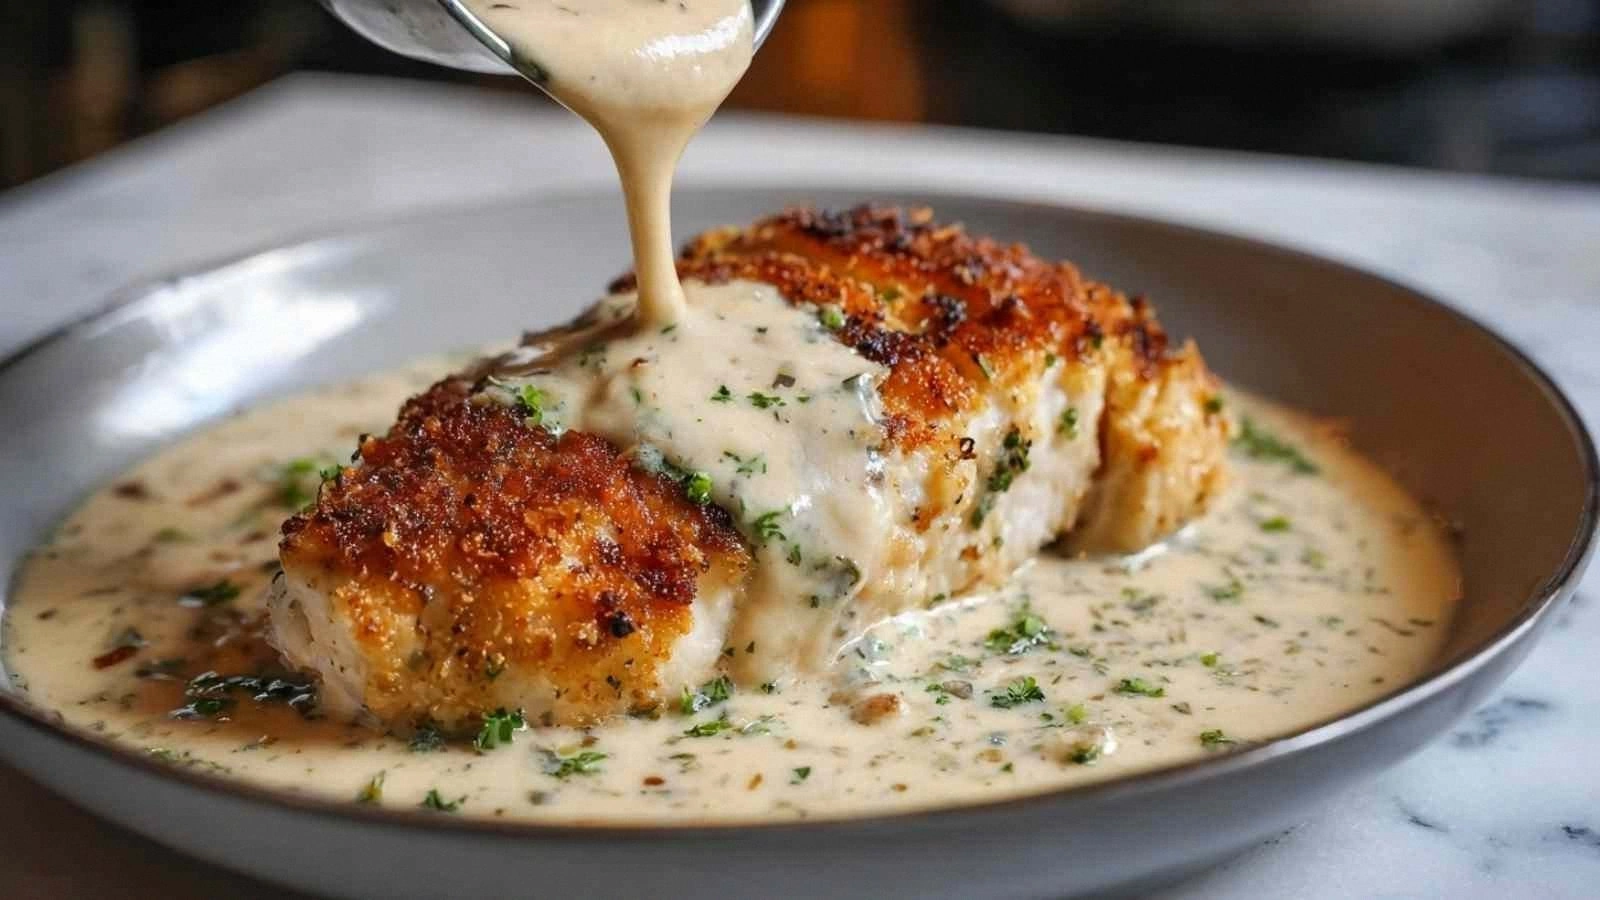
Picture this: the kitchen is a battlefield, and I’m the chef who just discovered the ultimate version of golden parmesan chicken. The last time I tried a similar dish, the coating fell off like a bad haircut and the sauce tasted like a grocery store mystery mix. I stared at the burnt tray, muttered a curse, and swore I’d never let a chicken dish ruin my dinner again. That night, I was determined to find the holy grail of crispy, creamy chicken, and I’m not kidding when I say the result is hands down the best version you’ll ever make at home.
When the first piece of chicken hit the hot skillet, it sang a high‑pitched sizzle that sent a wave of buttery, nutty aroma through the kitchen. The golden crust crackled like a crisp sunrise, and the scent of garlic and Parmesan floated up, mingling with the faint hint of fresh parsley. You could hear the pan hiss, feel the heat radiate from the countertop, and taste the buttery tang on your tongue even before the first bite. That sensory orchestra is what makes this dish a full‑bodied experience, not just a meal.
I’ve tried dozens of recipes that promise “golden” chicken, but most of them fall short—thin, soggy edges, or a sauce that’s either too thick or too thin. The secret here is a simple yet precise coating process that locks in moisture, a creamy garlic sauce that coats the chicken like velvet, and a final flourish of fresh Parmesan that gives it a bright, nutty finish. It’s a recipe that balances crunch and tenderness, flavor and texture, and it’s so reliable that I’ve already had to keep a stash of the finished dish in the fridge for last‑minute guests.
What you’re about to learn includes a technique you’ll never see in a standard recipe: a double‑dredge method that creates a crispy shell that shatters like thin ice. I’ll also show you how to make a sauce that’s rich enough to coat every surface, but not so heavy that it overwhelms the chicken’s natural flavor. Trust me, I dare you to taste this and not go back for seconds.
Let me walk you through every single step—by the end, you’ll wonder how you ever made it any other way. Picture yourself pulling this out of the oven, the whole kitchen smelling incredible, and everyone asking what’s on the menu. Stay with me here—this is worth it.
What Makes This Version Stand Out
- Texture: The double‑dredge creates a crunch that shatters like thin ice, delivering a satisfying bite that holds up against the creamy sauce.
- Flavor: A balanced blend of garlic, Italian seasoning, and paprika gives the coating depth without overpowering the chicken.
- Sauce: The garlic‑cream sauce coats the chicken like velvet, with a subtle Parmesan tang that brightens every bite.
- Ease: The prep time is just 15 minutes, and the cooking process is straightforward—no complicated steps or obscure ingredients.
- Versatility: It’s a crowd‑pleaser that works for week‑night dinners, holiday gatherings, or a quick date night.
- Make‑ahead: The chicken can be cooked in advance and reheated without losing its crunch or flavor.
Alright, let’s break down exactly what goes into this masterpiece…
Inside the Ingredient List
The Flavor Base
At the heart of this dish is the seasoned coating. The all‑purpose flour acts as a binding agent, allowing the eggs to adhere to the chicken and the panko to create that signature crunch. The garlic powder, dried Italian seasoning, paprika, salt, and black pepper infuse the coating with a savory, aromatic profile. If you skip any of these, the coating will taste flat and the chicken will lack that memorable burst of flavor. For a lighter version, replace the all‑purpose flour with a gluten‑free blend, but keep the panko for crunch.
The Texture Crew
The panko breadcrumbs are the secret to that airy, light crunch. They’re coarser than regular breadcrumbs, so they absorb less oil and maintain their crispness throughout cooking. The fresh Parmesan cheese mixed into the coating adds a subtle nutty flavor and helps the coating set. If you don’t have fresh Parmesan, grated aged Parmesan will still work but will be less bright. A tip for selecting the best Parmesan: look for a firm block with a sharp, clean scent—this guarantees a richer flavor.
The Unexpected Star
Garlic isn’t just a seasoning here—it’s a star ingredient that elevates the entire dish. The minced garlic, sautéed in butter, forms the base of the creamy sauce, infusing it with a deep, savory aroma that lingers on the palate. The garlic also acts as a natural tenderizer for the chicken, keeping the meat juicy. If you’re a garlic lover, feel free to add a pinch of red pepper flakes for a subtle heat that balances the richness.
The Final Flourish
The heavy cream and chicken broth create a silky sauce that coats the chicken like velvet. The fresh Parmesan added at the end of sauce preparation brightens the flavor profile and provides a subtle umami kick. Fresh parsley gives the dish a pop of color and a hint of brightness that cuts through the richness. A quick swap: use half‑and‑half instead of heavy cream for a lighter version, but the sauce will be less thick.
Everything’s prepped? Good. Let’s get into the real action…
The Method — Step by Step
- Prepare the coating station. Lay out three shallow dishes: one with flour, one with beaten eggs, and one with a mixture of panko, grated Parmesan, garlic powder, Italian seasoning, paprika, salt, and pepper. Pat the chicken breasts dry with paper towels; this ensures the coating adheres properly. This step is critical—if the chicken is wet, the coating will peel off during frying.
- First dredge. Coat each breast in flour, tapping off excess. This creates a thin base that helps the egg wash stick. The flour also helps the coating adhere to the chicken during the second dredge.
- Second dredge. Dip the floured chicken into the egg wash, then into the panko mixture, pressing gently to ensure the crumbs stick. The double dredge is what gives the chicken its signature crunch. Don’t rush this step; a loose coating will lead to a soggy finish.
- Heat the skillet. In a large skillet, heat ⅓ cup olive oil over medium‑high heat until shimmering. Add 3 tablespoons butter and let it melt, swirling the pan to coat the bottom. The butter adds flavor and helps the coating brown evenly.
- Cook the chicken. Place the coated breasts in the skillet, skin‑side up, and cook for 4–5 minutes until golden brown. Flip and cook the other side for another 4–5 minutes. The chicken should be cooked through (internal temperature 165°F) and the coating should be crisp and golden.
- Remove and rest. Transfer the chicken to a plate lined with paper towels to drain excess oil. Let it rest for 3–4 minutes; this allows the juices to redistribute and keeps the meat juicy.
- Make the sauce. In the same skillet, reduce the heat to medium and add 4 minced garlic cloves. Sauté until fragrant, about 30 seconds—watch out for burning. Add the pre‑mixed cream mixture, stirring constantly. Let it simmer until it thickens slightly, about 3–4 minutes.
- Finish the dish. Return the chicken to the skillet, spooning the sauce over each piece. Sprinkle with fresh parsley and additional Parmesan if desired. Let the chicken simmer in the sauce for 1–2 minutes so the coating absorbs a bit of the sauce.
- Serve. Plate the chicken, spooning any remaining sauce over it. Garnish with extra parsley for color. This dish pairs beautifully with a light salad or roasted vegetables, but it also stands alone as a satisfying entrée.
That’s it—you did it. But hold on, I’ve got a few more tricks that’ll take this to another level…
Insider Tricks for Flawless Results
The Temperature Rule Nobody Follows
Many cooks think a high‑heat pan is the key to crispiness, but the secret lies in a steady medium‑high temperature that allows the coating to brown evenly without burning. Start the skillet at medium‑high, then lower to medium once the chicken hits the pan. This ensures the crust forms gradually and retains its crunch.
Why Your Nose Knows Best
The aroma of sizzling garlic and butter is a reliable indicator of doneness. When the smell turns nutty and the coating is golden, the chicken is ready to flip. If you’re unsure, use a meat thermometer; 165°F is the gold standard for safety and flavor.
The 5‑Minute Rest That Changes Everything
After removing the chicken from the skillet, let it rest on a wire rack or paper towels for 5 minutes. This step allows the juices to redistribute, preventing the meat from drying out when you cut into it. I’ve seen people skip this, only to find the chicken is dry and less flavorful.
Use Fresh Parmesan for a Bright Finish
Freshly grated Parmesan adds a bright, nutty flavor that canned or pre‑grated cheese can’t match. If you can’t find fresh, use a high‑quality aged Parmesan, but grate it yourself to ensure the texture is fine and the flavor is potent.
Keep the Sauce Light with a Whisk
Whisking the cream and broth mixture before adding it to the skillet prevents lumps. A whisk also helps incorporate air, giving the sauce a silky texture that coats the chicken like velvet.
Creative Twists and Variations
This recipe is a playground. Here are some of my favorite ways to switch things up:
Spicy Cajun Edition
Swap the paprika and Italian seasoning for Cajun spice blend, and add a pinch of cayenne pepper. The result is a smoky, spicy crust that pairs beautifully with a cool yogurt sauce.
Herb‑Infused Chicken
Replace the dried Italian seasoning with a mix of fresh thyme, rosemary, and oregano. Fold the herbs into the panko mixture for a fragrant, herby flavor that elevates the dish.
Low‑Carb Version
Use almond flour instead of all‑purpose flour, and replace panko with crushed pork rinds for crunch. The sauce can be made with coconut milk for a dairy‑free option.
Cheese‑Blasted Variation
Add shredded mozzarella to the coating for a gooey, melty interior. The cheese melts during cooking, creating pockets of goo that complement the crispy exterior.
Vegetarian Swap
Replace the chicken with thick slices of portobello mushrooms. Follow the same coating and sauce steps; the mushrooms absorb the sauce and develop a meaty texture.
Gluten‑Free Option
Use a gluten‑free all‑purpose flour blend and gluten‑free panko. The coating remains crisp, and the dish stays safe for those with celiac disease or gluten sensitivity.
Storing and Bringing It Back to Life
Fridge Storage
Store cooked chicken in an airtight container for up to 4 days. Keep the sauce separate if possible; this prevents the coating from becoming soggy. When ready to eat, reheat in a skillet over medium heat until warmed through.
Freezer Friendly
Wrap each chicken piece individually in parchment paper and place them in a freezer bag. Freeze for up to 3 months. Thaw overnight in the fridge before reheating.
Best Reheating Method
Reheat in a skillet with a splash of water to create steam. This steams the chicken back to its original juiciness while keeping the coating crisp. A tiny splash of water prevents the sauce from drying out.