I still remember the day I nearly threw my mixing bowl across the kitchen. I'd promised my best friend a batch of millionaire shortbread for her birthday, and the caramel had seized into a grainy, sugary disaster that looked like something you'd find at the bottom of a coffee mug. The chocolate topping cracked like thin ice on a winter pond, and the shortbread base crumbled like ancient parchment. I stood there, flour in my hair, butter on my shirt, wondering how something so simple could go so spectacularly wrong. That kitchen catastrophe sent me down a three-month rabbit hole of testing, tweaking, and tasting my way through what felt like a mountain of butter and chocolate. I became that person who brought shortbread to every gathering, who spent weekends perfecting the caramel's amber hue, who dreamed about the perfect snap of chocolate coating. And after countless batches (and yes, several more failures), I finally cracked the code to the most outrageously good millionaire shortbread you'll ever taste.
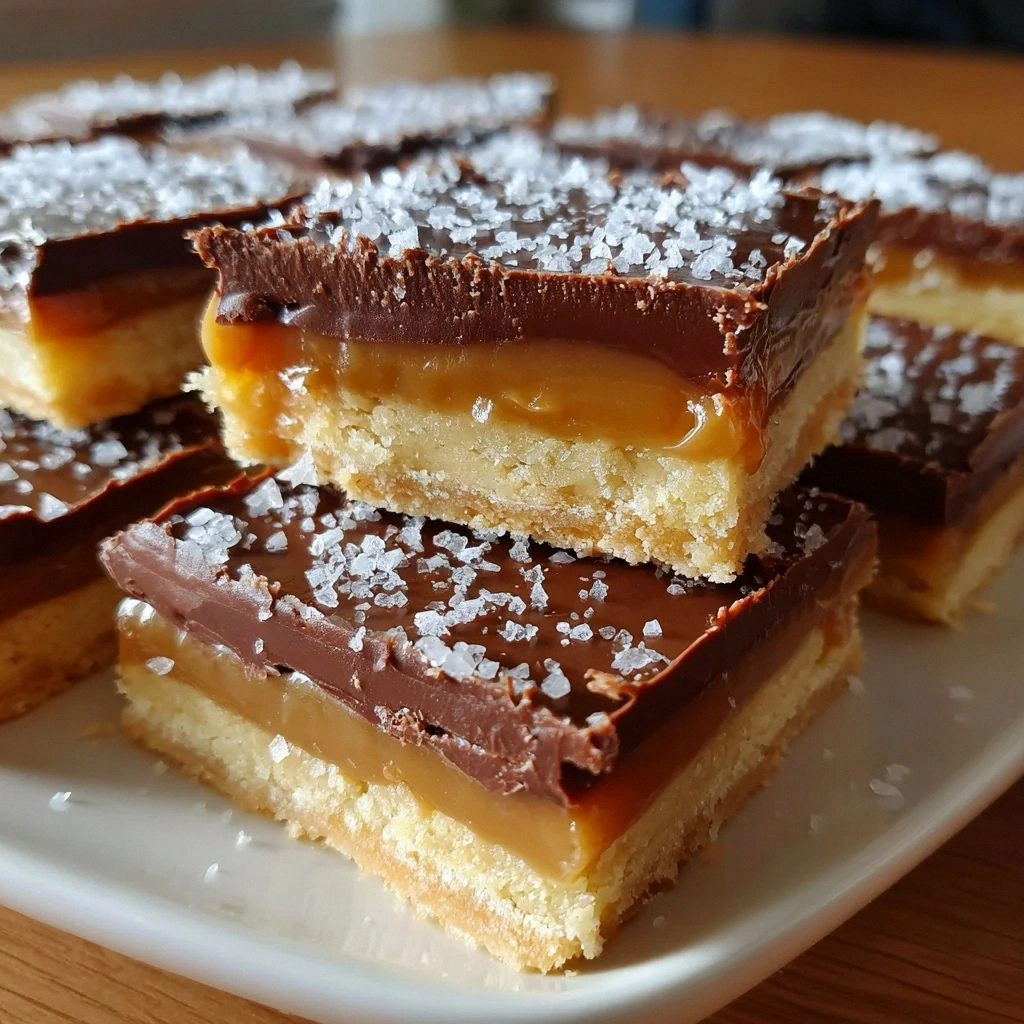
Picture this: a buttery, melt-in-your-mouth shortbread base that's tender yet holds its shape like a proud Scottish warrior. Then comes the caramel layer — not that sticky, tooth-pulling stuff you get in store-bought versions, but a silky, spoon-coating dream that tastes like someone captured sunshine and stirred it with cream. The chocolate top? Glossy, perfectly tempered, and snaps with satisfaction when you bite into it. But here's where things get interesting — I've added a few tricks that make this version absolutely foolproof. No more crystallized caramel, no more chocolate that blooms white and chalky, no more shortbread that tastes like sweet cardboard. This is the millionaire shortbread that will ruin all other desserts for you, the one that friends will request for every gathering, the one you'll find yourself making at midnight because you can't sleep without knowing there's some in your fridge.
What makes this recipe different from the thousands floating around the internet? I've figured out the science behind each layer, the temperature sweet spots, the timing that makes everything sing in harmony. The secret ingredient in the caramel will make you raise an eyebrow (trust me, it's not what you think), and the technique for the chocolate layer ensures it stays shiny for days. I've tested this recipe in different climates, at different altitudes, with different ovens — and it works every single time. No more crossing your fingers and hoping for the best. This is baking with confidence, with swagger, with the knowledge that you're about to create something extraordinary.
Let me walk you through every single step — by the end, you'll wonder how you ever made it any other way.
What Makes This Version Stand Out
Before we dive into the nitty-gritty, let me tell you why this particular millionaire shortbread will become your new obsession. I've eaten my way through bakery versions, homemade attempts, and even those fancy gourmet versions that cost more than a decent bottle of wine. None of them come close to what we're about to create together.
Buttery Perfection: The shortbread base uses a combination of techniques borrowed from Scottish grandmothers and French pastry chefs. The result is a texture that's somehow both crumbly and cohesive, with edges that shatter delicately while the center stays tender. Most recipes get this completely wrong, producing either a rock-hard base or something that dissolves into sand the moment you bite it.
Caramel That Actually Works: Here's where I get opinionated — most caramel recipes are setting you up for failure. They tell you to stir sugar and hope for the best, leading to crystallization disasters that would make a chemist cry. My method uses a foolproof technique with corn syrup that prevents crystallization, ensuring your caramel stays silky smooth every single time.
Chocolate That Behaves: Ever wonder why your chocolate layer turns white and chalky after a day? That's called blooming, and it's the result of improper tempering or temperature shock. I've developed a simplified tempering method that doesn't require a thermometer or any fancy equipment, giving you that professional shine and snap without the pastry school education.
Make-Ahead Magic: This recipe actually gets better after a day in the fridge. The flavors meld, the layers settle, and something magical happens between the caramel and shortbread that makes it even more addictive. Most desserts degrade over time — this one improves like a fine wine.
Crowd Psychology: I've served this to people who claim they "don't like sweets" and watched them go back for thirds. There's something about the salt-sweet balance, the textural contrast, and the richness that bypasses all rational resistance. I dare you to taste this and not go back for seconds.
Ingredient Quality Spotlight: We're using real butter, not margarine. Real chocolate, not chocolate chips with stabilizers. Real cream, not the stuff from a can. The difference is immediately apparent — this tastes expensive, luxurious, worth every single calorie.
The Confidence Factor: Once you master this recipe, you'll feel like a baking rockstar. The techniques you learn here — proper caramel making, simple chocolate tempering, perfect shortbread texture — transfer to dozens of other desserts. This isn't just a recipe; it's a masterclass in baking fundamentals disguised as an addictive treat.
Alright, let's break down exactly what goes into this masterpiece...
Inside the Ingredient List
Every ingredient in this recipe pulls its weight and then some. I've tested substitutions, shortcuts, and fancy upgrades, and what follows is the perfect balance of accessibility and excellence. You can find everything at a regular grocery store, but each item has been chosen for maximum impact.
The Flavor Foundation
Salted Butter: Don't reach for the unsalted stuff — the salt in the butter seasons the shortbread perfectly and balances the sweetness of the caramel. European-style butter with its higher fat content makes the shortbread even more tender, but regular grocery store butter works beautifully too. The key is that it must be properly softened; cold butter won't incorporate air properly, leading to dense, tough shortbread that tastes like sweet crackers.
Vanilla Extract: This isn't just for show — real vanilla adds warmth and complexity that makes people wonder what your secret is. Skip the imitation stuff; it's like the difference between a fresh flower and an air freshener. I use Madagascar bourbon vanilla for its rich, creamy flavor that plays beautifully with both the caramel and chocolate layers.
Kosher Salt: Just a pinch enhances all the other flavors without making anything taste salty. It's like turning up the volume on every other ingredient. I prefer kosher salt because its larger crystals dissolve more slowly, giving you little bursts of saltiness that make the sweet components taste even sweeter.
The Texture Crew
Cake Flour: Here's where we get technical — cake flour has less protein than all-purpose flour, which means less gluten development and a more tender shortbread. The fine texture creates that delicate, crumbly texture that shatters perfectly when you bite into it. If you absolutely must substitute, you can use all-purpose flour minus two tablespoons per cup, but the texture won't be quite as ethereal.
Egg Yolk: This is my secret weapon for shortbread that holds together without being tough. The yolk adds richness and helps bind the crumbs just enough, while the fat contributes to that melt-in-your-mouth sensation. Don't use the whole egg — the white would make the shortbread tough and rubbery, like a sad cookie that forgot how to be tender.
The Caramel Dream Team
Sweetened Condensed Milk: This is what transforms regular caramel into something worthy of millionaire status. The concentrated milk sugars create a caramel that's smooth, stable, and positively addictive. Don't confuse it with evaporated milk — they're completely different beasts, and using the wrong one will leave you with a watery, disappointing caramel that never sets properly.
Light Brown Sugar: The molasses in brown sugar adds depth and complexity that white sugar simply can't match. It provides subtle notes of toffee and butterscotch that make people close their eyes involuntarily when they taste it. Dark brown sugar works too, but it can overpower the more delicate flavors — light brown hits the perfect balance.
Corn Syrup: Before you panic about corn syrup, understand that we're using a small amount as an insurance policy against crystallization. It doesn't affect the flavor, but it ensures your caramel stays smooth and silky instead of turning into a grainy, sugary mess. If you're really opposed, you can substitute with golden syrup or honey, but the flavor profile will change slightly.
The Chocolate Finale
Semi-Sweet Chocolate: Here's where quality really matters — cheap chocolate tastes waxy and one-dimensional. Look for chocolate with at least 60% cocoa content for the perfect balance of sweetness and depth. I often use a combination of semi-sweet and a small amount of bittersweet chocolate for complexity that makes people ask for your recipe before they've even finished chewing.
Heavy Cream: This creates the ganache that keeps the chocolate layer soft enough to cut without cracking, but firm enough to provide that satisfying snap. The fat content is crucial — don't try to substitute with milk or half-and-half unless you want a chocolate layer that weeps and sweats like it's nervous about being eaten.
The Gourmet Touch
Flaky Sea Salt: That final sprinkle on top isn't just for show — it creates little flavor explosions that make the chocolate taste more chocolatey and the caramel more caramel-y. Maldon salt is my go-to for its delicate pyramid crystals that dissolve on your tongue at just the right moment. Regular table salt would be too harsh and would dissolve immediately, missing that textural contrast that makes people reach for another piece.
Everything's prepped? Good. Let's get into the real action...
The Method — Step by Step
Okay, ready for the game-changer? I'm going to walk you through each step like we're standing side by side in your kitchen. I've made every mistake possible so you don't have to, and by the end of this, you'll have a dessert that looks like it came from a Parisian patisserie but tastes like home.
- Start with the Shortbread Foundation: Preheat your oven to 325°F (160°C) — this lower temperature prevents the shortbread from browning too quickly while ensuring it cooks through completely. In your stand mixer (or with a hand mixer if you're feeling ambitious), beat the softened butter until it's pale and fluffy, about 3-4 minutes. You're not just mixing here — you're incorporating air that will make the shortbread light and tender. Add the sugar and continue beating until the mixture looks like pale yellow clouds, another 2 minutes. Beat in the egg yolk and vanilla until fully incorporated, scraping down the sides as needed. The mixture should look like sunshine in bowl form — smooth, yellow, and promising delicious things to come.
- Bring the Dough Together: In a separate bowl, whisk together the cake flour and salt. With the mixer on low speed, gradually add the flour mixture to the butter mixture. As soon as the dough starts to come together, stop the mixer. Over-mixing develops gluten, which turns your tender shortbread into something that could double as building material. The dough should look crumbly but hold together when you squeeze a handful — think of wet sand at the beach when you're building the perfect sandcastle. If it seems too dry, you can add a teaspoon of water, but resist the urge to add more.
- Press and Score: Press the dough evenly into a 9-inch square pan lined with parchment paper, leaving an overhang on two sides (this creates handles for easy removal later). Use the bottom of a measuring cup to press it down firmly and evenly — you want it compact but not compressed like concrete. Score the surface with a fork, creating little holes that prevent air bubbles from forming and help the shortbread stay flat. This next part? Pure magic. Chill the pan in the refrigerator for 30 minutes — this relaxes the gluten and firms up the butter, preventing the shortbread from shrinking or becoming tough during baking.
- Bake to Golden Perfection: Bake for 25-30 minutes, until the edges are just starting to turn golden. The center should still look pale — it will continue cooking from residual heat after you remove it from the oven. The smell wafting through your kitchen should make you weak in the knees: buttery, toasty, with hints of vanilla that smell like comfort itself. Let it cool completely in the pan on a wire rack — this patience pays off because a warm base will melt the caramel and create a soggy mess that would make any self-respecting baker weep.
- Conquer the Caramel: In a heavy-bottomed saucepan, combine the sweetened condensed milk, brown sugar, butter, corn syrup, and a pinch of salt. Use a pan that's larger than you think you need — caramel bubbles up dramatically and you don't want to spend your evening cleaning burnt sugar off your stovetop. Cook over medium heat, stirring constantly with a heatproof spatula. Don't walk away from the stove here — caramel can go from perfect to burnt in the time it takes to check your phone. The mixture will start to thicken and darken, turning from pale beige to rich amber like autumn leaves changing color. This takes about 8-10 minutes, and you'll know it's ready when it thickly coats the back of your spatula and leaves a trail when you drag your finger through it.
- Pour and Smooth: Immediately pour the hot caramel over the cooled shortbread base, tilting the pan to spread it evenly. Work quickly but carefully — as the caramel cools, it becomes harder to spread smoothly. Use an offset spatula or the back of a spoon that's been heated with hot water (and dried) to smooth the surface. The caramel should form a thick, even layer that completely covers the shortbread — no bald spots allowed. Let this cool for about 15 minutes until it's set but still slightly warm — this is the perfect time to prepare your chocolate layer.
- Melt Chocolate Like a Pro: In a heatproof bowl set over a pan of barely simmering water (make sure the bowl doesn't touch the water), melt about two-thirds of your chocolate, stirring gently until smooth. Remove from heat and add the remaining chocolate, stirring until completely melted — this is called seeding, and it's how we temper chocolate without any fancy equipment. The chocolate should be glossy and smooth, coating your spoon like liquid velvet. If you've ever struggled with chocolate that turns white and chalky, this technique is your new best friend.
- Create the Chocolate Cap: Pour the melted chocolate over the caramel layer, spreading it evenly with an offset spatula. The chocolate should form a thin, even layer that completely covers the caramel — think of it as a delicious chocolate blanket. While the chocolate is still soft, sprinkle the flaky sea salt over the top. Be judicious — you want little bursts of salt, not a salt lick. The salt will dissolve slightly into the warm chocolate, creating pockets of flavor that make the whole thing sing.
- The Final Set: Now comes the hardest part — waiting. Refrigerate the whole pan for at least 2 hours, until everything is completely set and firm. This waiting period allows the flavors to meld and the textures to stabilize. The anticipation will be killer — your fridge will call to you every time you walk past — but good things come to those who wait. When you're ready to serve, use the parchment paper handles to lift the whole thing out of the pan, then cut into squares with a sharp knife that's been warmed with hot water (and dried) for clean cuts.
That's it — you did it. But hold on, I've got a few more tricks that'll take this to another level...
Insider Tricks for Flawless Results
After making this recipe more times than I care to admit (my jeans can attest to this), I've discovered some game-changing techniques that separate good millionaire shortbread from the kind that makes people close their eyes and sigh involuntarily. These aren't just suggestions — they're the difference between amateur hour and professional-level results.
The Temperature Rule Nobody Follows
Here's the thing about temperature — it's either your best friend or your worst enemy in this recipe. The butter for the shortbread needs to be room temperature, but not melty-soft. When you press your finger into it, it should give slightly but still hold its shape. Too cold and it won't incorporate air properly, leading to dense, tough shortbread. Too warm and it becomes greasy, creating a base that tastes like sweet butter crackers. The sweet spot is butter that's been out of the fridge for about 90 minutes in a 70°F kitchen. If you're in a hurry, cut it into small cubes and let it sit near a warm oven for 15 minutes, but don't microwave it unless you want greasy disappointment.
Why Your Nose Knows Best
Forget timers — your nose is the most reliable tool for knowing when the shortbread is perfectly baked. When it's ready, your kitchen will smell like butter and vanilla had a beautiful baby, with toasty notes that make you want to bottle the aroma. The edges should be just barely golden, like a summer tan that's still in the "healthy glow" phase rather than "lobster red." The center will still look pale, but don't be tempted to keep baking — it continues cooking from residual heat and will firm up as it cools. I've seen more shortbread ruined by over-baking than any other mistake. Trust your senses, not just the clock.
The 5-Minute Rest That Changes Everything
After you pour the caramel over the shortbread, let it rest for exactly 5 minutes before adding the chocolate. This brief pause allows the caramel to set slightly, creating a barrier that prevents the warm chocolate from melting into the caramel layer. The result is distinct, beautiful layers that you can see in every slice, rather than a muddled mess that looks like it got confused about what it wanted to be. This tiny wait time creates the professional-looking contrast that makes people think you spent way more time on this than you actually did.
The Salt Timing Secret
Most recipes tell you to add the flaky salt immediately after spreading the chocolate, but I've found a better way. Wait about 90 seconds — just long enough for the chocolate to start setting but not so long that it hardens completely. This timing allows the salt to stick to the surface without dissolving completely, giving you those little pops of saltiness that make the sweet components taste even sweeter. Add it too early and the salt dissolves into the chocolate, disappearing like it was never there. Too late and it won't stick, rolling off like tiny white marbles.
Storage That Actually Works
Here's where I confess — I ate half the batch before anyone else got to try it, and the only way I stopped myself was by learning how to store it properly. These bars actually improve after a day in the refrigerator, but they need to be wrapped tightly in plastic wrap, then sealed in an airtight container. The chocolate will stay shiny, the caramel will achieve the perfect chewy texture, and the shortbread will maintain its tender crumb. Stored this way, they'll keep for up to a week, though they've never lasted more than three days in my house. For longer storage, wrap individual squares in plastic wrap, then aluminum foil, and freeze for up to two months.
Creative Twists and Variations
This recipe is a playground. Here are some of my favorite ways to switch things up:
The Coffee Lover's Dream
Add a tablespoon of instant espresso powder to the shortbread dough and replace the vanilla in the caramel with coffee liqueur. The result tastes like your favorite coffee shop got transformed into a dessert — rich, sophisticated, and perfect for serving after dinner. The coffee flavor intensifies the chocolate notes and adds depth that makes people ask what your secret ingredient is. Top with chocolate-covered espresso beans for extra coffee credibility.
Salted Caramel Pretzel Crunch
Press crushed pretzels into the caramel layer before it sets completely, then finish with the chocolate as usual. The salty crunch adds textural interest and makes these impossible to stop eating. The pretzels stay surprisingly crisp for several days, creating little pockets of crunch that contrast beautifully with the smooth caramel. Use small pretzel twists rather than sticks — they distribute more evenly and don't create awkward bumps in the chocolate layer.
Orange You Glad You Tried This
Add the zest of one orange to the shortbread dough and replace the vanilla with orange extract. Stir a tablespoon of orange zest into the caramel for a bright, citrusy note that cuts through the richness. The combination of orange and chocolate is classic for a reason — it's like a sophisticated version of those chocolate oranges you get at Christmas, but way more addictive.
Peanut Butter Billionaire Bars
Replace half the butter in the caramel with smooth peanut butter for a Reese's cup meets millionaire shortbread situation that will make peanut butter lovers weep with joy. The peanut butter adds richness and that unmistakable flavor that pairs perfectly with chocolate. I dare you to taste this and not go back for seconds — it's physically impossible. Sprinkle chopped roasted peanuts on top for extra texture and peanut flavor.
White Chocolate Raspberry Royalty
Use white chocolate for the top layer and swirl raspberry puree into the caramel before it sets completely. The tart raspberries balance the sweetness of white chocolate perfectly, creating a dessert that's both beautiful and delicious. The pink swirls make these look like they came from a fancy bakery, and the flavor combination tastes like summer in dessert form. Fresh raspberries pressed into the top add color and freshness that elevates the whole experience.
Spiced Autumn Version
Add a teaspoon of cinnamon and a quarter teaspoon each of nutmeg and cardamom to the shortbread dough. The warm spices make these taste like autumn in every bite, perfect for when the weather turns cool and you want something comforting. The spices enhance the caramel notes and make the chocolate taste more complex. These disappear faster at fall gatherings than pumpkin pie, and that's saying something.
Storing and Bringing It Back to Life
Fridge Storage
These bars actually benefit from refrigeration — the cold firms up the caramel to the perfect chewy texture and keeps the chocolate glossy. Store them in an airtight container, with layers separated by parchment paper to prevent sticking. They'll keep for up to a week in the refrigerator, though the flavor is best within the first four days. The cold intensifies all the flavors in the most delightful way, making each bite more impactful than the last.
Freezer Friendly
Most recipes get this completely wrong — they don't tell you that millionaire shortbread freezes beautifully if you do it correctly. Wrap individual squares tightly in plastic wrap, then in aluminum foil, and freeze for up to two months. When you're ready to serve, let them thaw in the refrigerator overnight. The texture remains perfect, and having a stash of these in your freezer means you're always 12 hours away from dessert that will impress anyone. Future pacing: picture yourself pulling these out for unexpected guests and watching their faces light up with joy.
Best Serving Method
While some people serve these straight from the refrigerator, I prefer to let them sit at room temperature for about 15 minutes before serving. This brief warming allows the chocolate to soften slightly and the caramel to achieve that perfect chewy texture that doesn't stick to your teeth. The flavors bloom at room temperature in a way they don't when they're ice-cold. If you've frozen them, this step is even more important — the transformation from frozen to slightly warmed is like watching a caterpillar become a butterfly, but tastier.