I was halfway through a week‑night dinner, juggling a skillet of chicken and a pot of instant ramen, when my friend texted me a dare: “Show me the best chili you can make with pulled pork, and you have to use a beer I bought last week.” I laughed, but the challenge stuck. I stared at the smoked pulled pork on my counter, feeling the weight of that smoky promise. The idea of turning a simple pot of chili into something that would make my friends question their own recipes was already a culinary dare. I was ready to turn that dare into a culinary masterpiece.
The first thing that greeted me was the aroma of the pulled pork, already infused with a deep, smoky char. When I tossed the masa into the pot, it released a nutty fragrance that danced with the cumin and garlic powder. The beer, with its hoppy undertones, added a subtle bitterness that countered the sweetness of the canned Rotel. The green bell pepper added a crisp bite, and the jalapeño’s heat began to swirl through the broth like a small wildfire. By the time the beans settled in, the kitchen smelled like a rustic barbecue joint on a summer night.
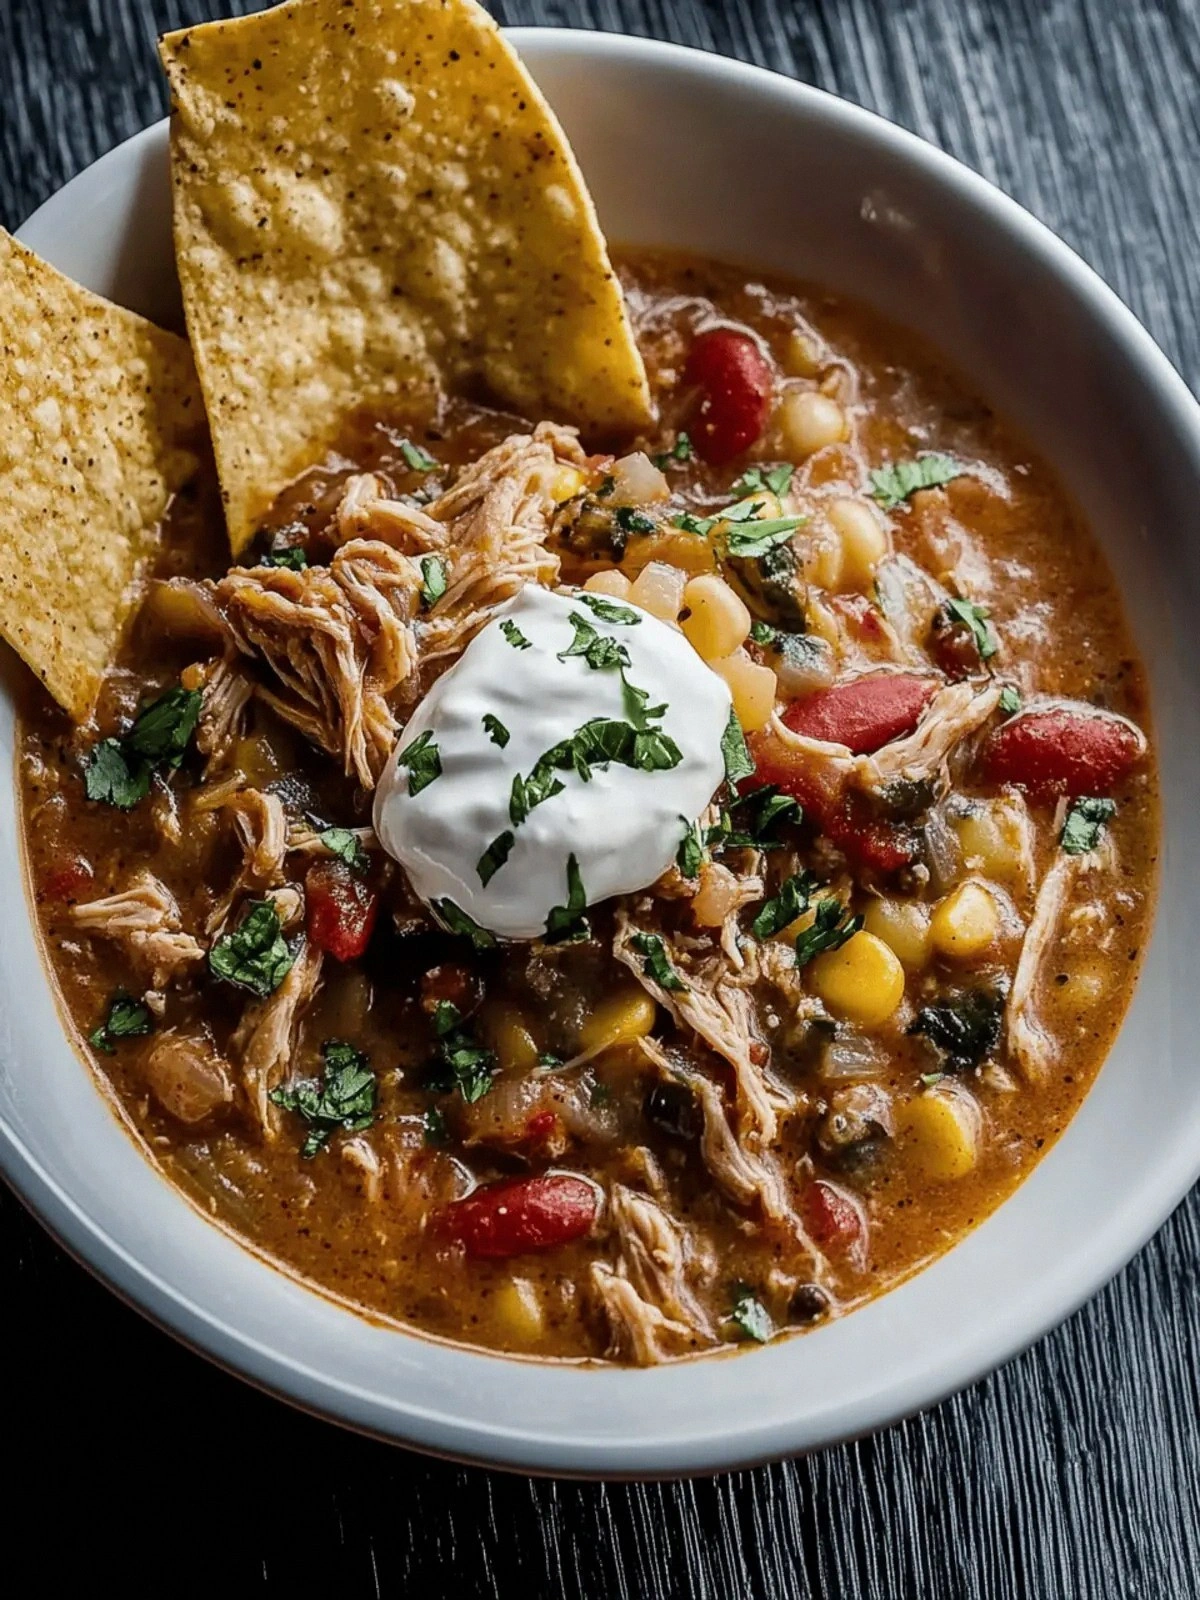
What makes this chili truly unforgettable is the marriage of textures: the tender pulled pork, the creamy beans, and the silky masa base that coats the bowl like velvet. The beer infuses the broth with a depth you’d expect from a slow‑cooked stew, while the salsa verde adds a bright, green acidity that cuts through the richness. The single jalapeño gives a clean, focused heat rather than a chaotic burn, and the Rotel’s tomatoes bring a smoky sweetness that ties everything together. I dare you to taste this and not go back for seconds. It’s hands down the best version you’ll ever make at home, and it will transform your perception of pulled‑pork chili forever.
I’ll be honest — I ate half the batch before anyone else got to try it. The secret ingredient is the masa flour, which thickens the chili without turning it into a porridge. I’ll also show you how to use the beer to deglaze the pan, pulling out every last flavor from the pork bones. If you’ve ever struggled with a bland chili that feels like a bowl of soup, you’re not alone, and I’ve got the fix. Picture yourself pulling this out of the pot, the whole kitchen smelling incredible, and everyone asking for the recipe. Stay with me here — this is worth it.
Let me walk you through every single step — by the end, you'll wonder how you ever made it any other way. We'll start with the flavor base, then layer in the textures, and finish with that final, irresistible kick. Each step is packed with sensory checkpoints, so you know exactly when your chili is ready to wow the palate. Ready? Let's dive in.
What Makes This Version Stand Out
- Smoky Depth: The smoked pulled pork brings a complex char that lingers on the tongue. It’s the foundation that turns ordinary chili into a smoky masterpiece. The pork’s natural juices mingle with the masa to create a silky, savory base.
- Beer‑Infused Broth: Using beer instead of water adds a subtle hop bitterness that balances the sweetness of the Rotel and the salsa verde. It also helps to dissolve the masa more smoothly, giving the chili a velvety consistency. The result is a richer, more layered flavor profile.
- Single Jalapeño Focus: Rather than a handful of peppers, a single jalapeño delivers a clean, bright heat that doesn’t overwhelm. It allows the other flavors to shine while still providing that essential kick. The pepper’s heat is consistent, making the dish more predictable.
- Texture Play: The combination of tender pork, creamy beans, and a thick masa base creates a mouth‑watering contrast. Each bite offers a different sensation, from the soft pork to the slightly chewy beans, all coated in a silky sauce. This texture complexity keeps diners coming back.
- Easy Make‑Ahead: The chili can be made a day ahead, allowing the flavors to meld overnight. When reheated, it’s as good as new, with the masa settling into the broth. This makes it a perfect crowd‑pleaser for parties or busy weeknights.
- Minimal Ingredients, Maximum Flavor: With just a handful of pantry staples, you can craft a dish that feels gourmet. The recipe’s simplicity means you can whip it up quickly without sacrificing depth. It’s the perfect balance of convenience and taste.
- Crowd‑Approved: Friends and family rave about the smoky, spicy, and creamy layers. It’s the kind of dish that becomes a staple at gatherings. The chili’s versatility allows it to pair with cornbread, rice, or tortilla chips.
Alright, let's break down exactly what goes into this masterpiece...
Inside the Ingredient List
The Flavor Base
Smoked pulled pork is the star of this dish, delivering a smoky, savory depth that anchors every bite. Use a pork shoulder that has a good smoke ring; it’ll give you the most pronounced flavor. If you’re short on time, shredded rotisserie pork works, but the smoked version is irreplaceable. Beef or chicken stock provides the liquid foundation; choose a low‑sodium variety to keep control over the final taste. Beer, preferably a mild lager, adds a subtle bitterness and helps the masa dissolve smoothly. For the masa, masa harina offers a corn undertone that’s essential; if you can’t find it, corn flour or cornstarch will suffice, but the flavor profile will shift slightly. Cumin, garlic powder, onion powder, and oregano form the aromatic backbone; fresh spices give a brighter kick, but the powders are more convenient and still potent.
The Texture Crew
The whole jalapeño adds a clean heat that’s easy to manage; if you like more fire, swap it for a serrano or a small habanero. Green bell pepper offers a sweet crunch that contrasts the softness of the pork. Yellow onion, diced, releases sweetness as it cooks, creating a mellow base. Rotel, a tomato and green pepper blend, adds a smoky sweetness and a touch of acidity. Salsa verde brings bright, green acidity that cuts through the richness and adds a fresh zing. Navy or cannellini beans contribute a creamy texture and a mild flavor that balances the boldness of the other ingredients.
The Unexpected Star
While the beans might seem ordinary, their creamy texture and subtle flavor are the unsung heroes that mellow the chili’s heat and give it body. If you’re vegetarian, swap the beans for chickpeas or black beans for a different protein profile. A splash of lime juice at the end brightens the dish and adds a citrusy lift that’s unexpected yet delightful. For a deeper umami punch, add a teaspoon of soy sauce or tamari during the simmering stage.
Everything's prepped? Good. Let's get into the real action...
The Method — Step by Step
- Heat a large Dutch oven over medium‑high heat and add a splash of oil. Once the oil shimmers, toss in the diced yellow onion and sauté until translucent, about 4 minutes. The onions should release a sweet aroma that signals the flavor base is forming. I’ll be honest — the first sizzle in the pan feels like a promise of greatness. Keep the heat steady so the onions don’t brown too quickly.
- Add the smoked pulled pork to the pot, stirring to coat it with the onion. Let the pork brown on all sides; this caramelization locks in flavor and adds depth. When the pork starts to sizzle, you’ll know the base is building. This step is the foundation; skip it and the chili will feel flat.
- Deglaze the pan with the beer, scraping up any browned bits from the bottom. Those bits are flavor gold, so don’t let them sit. The beer should reduce slightly, leaving a rich, hoppy broth. The aroma at this point is intoxicating, and it’s a sign you’re on the right track. Kitchen Hack: If the beer reduces too quickly, lower the heat to medium and let it simmer gently; this prevents burning and preserves the hop notes.
- Stir in the masa harina, cumin, garlic powder, onion powder, and oregano. Mix until the masa is fully incorporated and the mixture turns a light brown. The masa should coat the pork and onions, creating a thickening agent that will give the chili its silky body. This step is crucial for texture; a thin sauce will feel like soup.
- Add the stock, Rotel, salsa verde, and diced green bell pepper. Bring the mixture to a gentle boil, then reduce to a low simmer. The chili should bubble softly, not erupt. Keep the heat low so the flavors meld without scorching. Watch Out: If you let the chili boil too hard, the masa can break down and become gummy. Maintain a gentle simmer to preserve the silky texture.
- Add the whole jalapeño and the white beans. Let the chili simmer for 20 minutes, stirring occasionally. The beans will soften and absorb the flavors, while the jalapeño releases its heat. During this time, the sauce thickens and the aromas become richer. This is the moment of truth; the chili should smell like a smoky, spicy dream.
- Remove the jalapeño, slice it into thin rings, and return the slices to the pot. This gives a controlled heat and a decorative touch. The rings should be translucent and slightly crisp. The chili now has a layered heat profile that’s both bold and balanced.
- Taste and season with salt and pepper. If you want a smoky kick, add a dash of smoked paprika or a splash of Worcestershire sauce. The final seasoning should be just right, not overpowering. This is the final polish that turns a good chili into an unforgettable dish.
- Serve hot over rice, with a dollop of sour cream, or on a bed of cornbread. Garnish with fresh cilantro, a squeeze of lime, and extra jalapeño slices for those who like it hot. The presentation should look inviting, with a splash of color from the green salsa and the bright green pepper. This is the moment where everything comes together.
- Enjoy immediately, or let it cool and refrigerate for up to 4 days. The chili tastes even better the next day as the flavors deepen. When reheating, add a splash of water to keep it from drying out. Remember, a good chili is a living dish that improves over time.
That's it — you did it. But hold on, I've got a few more tricks that'll take this to another level...
Insider Tricks for Flawless Results
The Temperature Rule Nobody Follows
Many cooks think a high simmer is the key, but the secret is a low, steady simmer that allows the masa to thicken without breaking down. I’ve seen chili turn gummy when the heat is too high; keep it low and let the flavors marry. If you’re using a gas stove, adjust the flame to a gentle 2‑3 out of 10. The result is a silky sauce that clings to the pork and beans.
Why Your Nose Knows Best
Before you taste the chili, let it rest for a minute. The aromas will intensify, giving you a better sense of balance. If the smell is too sharp, let it sit longer; the flavors will mellow. Trust your nose, not just your eyes. A well‑aroma signals that the chili has reached its peak.
The 5‑Minute Rest That Changes Everything
Once you remove the chili from the heat, let it sit covered for 5 minutes. This short rest allows the masa to set and the flavors to fuse. The result is a thicker, richer sauce that coats the ingredients perfectly. Skipping this step often leaves a watery chili.
Freshness Over Convenience
While canned Rotel is convenient, fresh tomatoes and green peppers can elevate the dish. If you have time, roast the tomatoes and peppers under the broiler for 5 minutes. This adds a smoky char that complements the pulled pork’s smoke. The extra step pays off in flavor.
Serve With the Right Side
Pair the chili with a side that can absorb the sauce. Cornbread, rice, or even a simple tortilla chip works. A side that’s too dry will leave the chili feeling thin. The right side turns each bite into a complete, satisfying experience.
Adjusting Heat on the Fly
If you’re unsure about the jalapeño’s heat, start with half the pepper and taste. You can always add more later. This allows you to control the spice level without risking an over‑spicy dish. The trick is gradual addition, not a sudden spike.
Creative Twists and Variations
This recipe is a playground. Here are some of my favorite ways to switch things up:
Tex‑Mex Twist
Swap the salsa verde for a smoky chipotle‑in‑adobo sauce and add a handful of corn kernels. The chipotle gives a deep, earthy heat, while the corn adds sweetness. Serve over tortilla chips for a crunchy bite.
Mexican Street Chili
Use a small amount of ancho chili powder and finish with fresh cilantro and a squeeze of lime. The ancho adds a mild, fruity heat that’s reminiscent of street tacos. This version is perfect for a quick, authentic taste.
Beerless Version
Replace the beer with a dry white wine or a splash of apple cider vinegar. The acidity will mimic the beer’s bitterness without the alcohol. This version works well for those who prefer a non‑alcoholic chili.
Vegetarian Swap
Replace the pulled pork with shredded jackfruit or tofu. Add extra beans and a splash of soy sauce for umami. The result is a hearty, plant‑based chili that still delivers on flavor.
Spicy Extra Kick
Drop in a diced habanero or a tablespoon of hot sauce during the simmer. The heat will be intense, so serve with a cooling side like yogurt or avocado slices. This version is for the spice lovers who crave an extra punch.
Kid‑Friendly Mild
Omit the jalapeño entirely and add a pinch of mild paprika. Keep the beans and pork, and finish with a dash of honey for sweetness. The chili will be mild yet flavorful, perfect for younger palates.
Storing and Bringing It Back to Life
Fridge Storage
Transfer the chili to an airtight container and refrigerate for up to 4 days. The flavors will deepen as the masa sets. When ready to eat, let it sit at room temperature for 15 minutes before reheating.
Freezer Friendly
Pack the chili in freezer‑safe containers or zip‑lock bags, removing as much air as possible. It will keep for up to 3 months. Thaw overnight in the fridge before reheating.
Best Reheating Method
Reheat on the stovetop over low heat, adding a splash of water or broth to maintain moisture. Stir frequently and bring to a gentle simmer. A minute or two of simmering will revive the chili’s flavor and texture. Remember to taste and adjust seasoning after reheating.