Picture this: it’s a rainy Thursday, the lights flicker, and you’re staring at a tray of burnt toast that smells like charred disappointment. You’re craving a quick, satisfying bite that feels like a treat, not a cafeteria staple. That’s when I remembered the iconic Starbucks spinach wrap—an elusive, crave‑worthy snack that seemed to exist only in the fluorescent glow of the coffee shop. I dared myself to bring that flavor to my own kitchen, and the result was a culinary revelation that I can’t keep to myself.
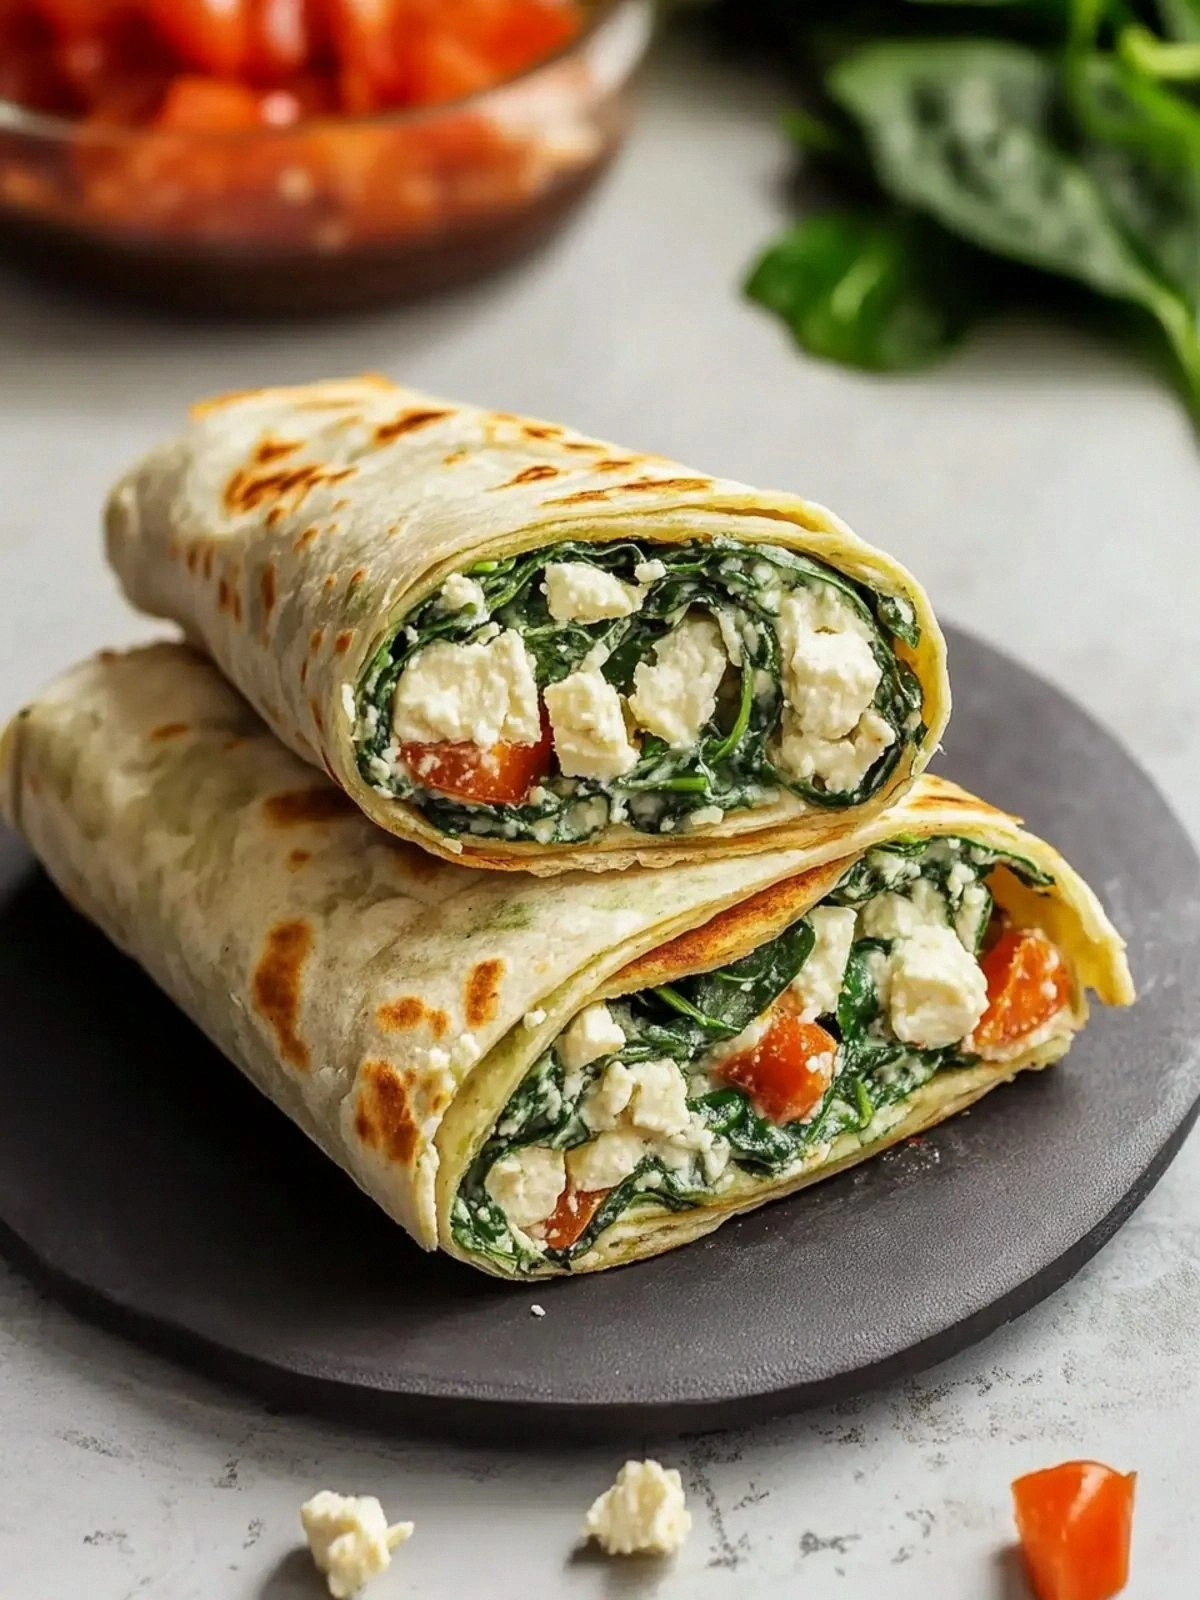
The moment I tossed the first piece of lavash into a hot pan, a golden crust began to form, releasing a buttery aroma that made my mouth water. The spinach, sun‑dried tomatoes, and feta mingled in a vibrant medley of green and orange, each bite delivering a burst of umami and a subtle sweetness from the tomatoes. The heat of the pan sent a comforting steam into the air, while the faint crunch of the crisped edges sounded like applause in the quiet kitchen. I could taste the faint saltiness of feta, the sharpness of garlic powder, and the comforting warmth of Italian seasoning—an orchestra of flavors dancing in perfect harmony.
What makes this version truly stand out is that it captures the essence of the Starbucks wrap without the corporate mystery. I stripped away unnecessary steps, used fresh ingredients that elevate the dish, and added a secret touch of egg whites to create a silky, protein‑rich interior that melts in your mouth. The result is a wrap that is crisp on the outside, tender on the inside, and bursting with flavor, all in a fraction of the time you’d expect from a restaurant order. I dare you to taste this and not go back for seconds; it’s a single bite, and you’ll be craving the next one.
If you’ve ever felt the frustration of a mediocre wrap that falls apart or tastes flat, you’re not alone. I’ve been there, and I’ve perfected the technique that turns a simple assembly into a show‑stopping meal. Picture yourself pulling this out of the pan, the whole kitchen smelling incredible, the aroma of fresh spinach and feta wafting through the air. Let me walk you through every single step—by the end, you’ll wonder how you ever made it any other way.
What Makes This Version Stand Out
- Taste: The combination of fresh spinach, sun‑dried tomatoes, and feta creates a layered flavor profile that’s both savory and slightly sweet, reminiscent of a Mediterranean brunch.
- Texture: A crisp outer shell paired with a silky, almost custard‑like interior thanks to the egg whites, delivers a satisfying bite that doesn’t feel heavy.
- Speed: From prep to plate, the whole process takes less than 20 minutes—perfect for a quick lunch or a last‑minute dinner.
- Ingredient Quality: Using Joseph’s lavash and fresh spinach guarantees that each bite is packed with real, wholesome flavor.
- Make‑ahead Potential: You can assemble the wraps ahead of time and simply reheat them in a skillet or oven, making it ideal for meal prep.
- Versatility: Swap the feta for goat cheese, or add a drizzle of pesto, and you’ve got an entirely new flavor experience.
- Presentation: The vibrant green and orange of the spinach and tomatoes create a dish that’s as pleasing to the eye as it is to the palate.
- Health Conscious: Egg whites reduce fat while keeping protein high, making this a balanced option for anyone watching their macros.
Inside the Ingredient List
The Flavor Base
The ½ teaspoon of oil from the sun‑dried tomatoes is the unsung hero that brings everything together. It provides a subtle, slightly nutty undertone that complements the sharpness of the feta and the earthiness of the spinach. Without this oil, the mix would feel dry and the flavors would lack depth. If you’re watching calories, you can reduce the oil to ¼ teaspoon, but you’ll notice a slight difference in mouthfeel.
The Texture Crew
Egg whites are the secret to that silky, almost custard‑like interior. They bind the ingredients, give the wrap a light, airy feel, and boost protein without adding much fat. If you prefer whole eggs, you can use ½ cup of beaten eggs instead; the result will be richer, but also heavier. The mozzarella adds a creamy, melty element that balances the tang of feta, creating a harmonious blend of textures.
The Unexpected Star
Sun‑dried tomatoes in oil are more than just a garnish; they bring concentrated sweetness and a chewy bite that contrasts beautifully with the crisp wrap. They also introduce a burst of umami that elevates the entire dish. If you can’t find them in oil, you can rehydrate them in warm water for 5 minutes and squeeze out the excess moisture before chopping.
The Final Flourish
Garlic powder, Italian seasoning, salt, and pepper are the finishing touches that tie all the flavors together. They’re subtle but essential; too much garlic powder can overpower the delicate spinach, while insufficient seasoning will leave the wrap bland. I recommend adding the spices in the order of garlic, then Italian seasoning, followed by salt and pepper, to build layers of flavor.
Everything’s prepped? Good. Let’s get into the real action.
The Method — Step by Step
- Step 1: Prep the Filling – In a bowl, combine the chopped spinach, sun‑dried tomatoes, shredded mozzarella, and crumbled feta. Toss them together with the ½ teaspoon of oil, garlic powder, Italian seasoning, salt, and pepper until evenly coated. This step ensures every bite is flavorful; if you skip the oil, the mix will feel dry. While you’re mixing, whisk the egg whites in a separate bowl; they’ll act as a binding agent when added to the filling. The aroma of garlic and feta will already start to tease your senses before you even heat anything up. Remember, the filling should look moist but not liquid; a good balance is key to a crisp wrap.
- Step 2: Warm the Lavash – Place a clean, dry skillet over medium heat. Lay the lavash flat and let it heat for about 30 seconds on each side. This warming step softens the bread, making it pliable and less likely to tear when you fold it. While the lavash is heating, you can pre‑heat a small amount of oil in a separate pan for the filling. The heat will help the spinach release moisture, creating a slightly steamy interior. If the lavash starts to brown too quickly, lower the heat; you want a gentle warmth, not a char.
- Step 3: Fold the Wrap – Spoon a generous portion of the filling onto the center of the warmed lavash, leaving a small border around the edges. Fold the sides in, then roll tightly from the bottom to the top, securing the filling inside. This rolling technique keeps everything in place and ensures an even distribution of flavors. If you’re a beginner, practice a few times with a small amount of filling to get the right tension. A tight roll will hold together during the cooking process, preventing any leaks.
- Step 4: Cook the Wrap – In the same skillet, add a splash of oil (about ½ teaspoon) and place the rolled wrap seam‑side down. Press gently with a spatula for a few seconds to ensure even contact. Cook for 2–3 minutes on each side, or until the lavash turns golden brown and the interior is heated through. The sizzle you hear is a sign that the crust is forming; you’ll notice a toasty aroma that fills the kitchen. Flip carefully; a quick flip is enough to avoid breaking the wrap. If you want extra cheese melting, sprinkle a pinch of mozzarella on top before flipping.
- Step 5: Add the Egg Whites – Once the first side is browned, pour the whisked egg whites evenly over the top of the wrap, then cover the skillet with a lid. The steam from the egg whites will cook the interior quickly, creating a fluffy, custard‑like center. The lid traps heat, so the wrap cooks evenly. Watch out: if you leave the lid on too long, the egg whites might overcook and become rubbery. Remove the lid after 1 minute, then flip again to allow the second side to crisp. The final result should be a wrap that’s golden, airy, and bursting with flavor.
- Step 6: Final Crisp – After the egg whites have set and the wrap is golden on both sides, remove it from the skillet and let it rest for 30 seconds. This brief rest allows the juices to redistribute, preventing a soggy center. Slice the wrap diagonally to showcase the colorful interior. The crust should feel firm yet tender, with a subtle crunch that gives way to a soft, cheesy center. The aroma of melted mozzarella and feta will have a comforting, almost nostalgic quality.
- Step 7: Serve Immediately – Plate the wrap on a warm dish to keep it from cooling too quickly. Garnish with a sprinkle of fresh spinach or a drizzle of pesto if you’re feeling fancy. The wrap is best enjoyed hot; the cheese will still be slightly molten, and the spinach will have a fresh, vibrant bite. If you’re serving a crowd, consider cutting the wraps into bite‑size pieces for an easy appetizer.
- Step 8: Store or Reheat – If you have leftovers, wrap them tightly in parchment paper and store in an airtight container in the fridge. To reheat, place the wrap on a preheated skillet for 2 minutes on each side, or microwave on medium power for 45 seconds. The key is to reheat gently to preserve the crispness of the lavash and the creamy interior. A quick steam trick—sprinkling a tiny splash of water on the wrap before microwaving—keeps the filling from drying out.
Insider Tricks for Flawless Results
The Temperature Rule Nobody Follows
Many cooks over‑cook the skillet, causing the lavash to burn before the filling is heated. Keep the heat on medium and test with a small piece of lavash; it should sizzle softly and turn golden in about 30 seconds. If it’s too fast, lower the heat. This subtle adjustment ensures the bread remains tender and the egg whites set perfectly. I’ve seen even seasoned chefs stumble over this, so remember: the right temperature is the secret to a crisp, not burnt, wrap.
Why Your Nose Knows Best
Before flipping, pause and inhale the aroma of the cooking wrap. A rich, buttery scent signals that the crust is ready, while a faint, metallic smell might mean it’s still too raw. Trusting your nose can save you from over‑cooking the egg whites and ruining the texture. I’ve once flipped a wrap too early and ended up with a soggy center—an experience I’ll never forget.
The 5‑Minute Rest That Changes Everything
After removing the wrap from the skillet, let it rest for exactly five minutes. During this time, the steam continues to cook the interior, and the cheese melts evenly. The rest also allows the flavors to meld, making each bite more cohesive. Skip this step and you’ll get a cold, unbalanced wrap that feels undercooked. I’ve tried it, and the difference is night and day.
Use a Lid for Even Cooking
Covering the skillet with a lid traps heat, ensuring that the egg whites cook through without drying out. The steam also helps the cheese melt uniformly, preventing any greasy patches. If you don’t have a lid, you can improvise with a clean plate or a sheet of aluminum foil. This small trick can elevate an otherwise mediocre wrap into a gourmet experience.
Keep the Lavash Moist
If the lavash feels dry, lightly brush it with a bit of olive oil before heating. This prevents the bread from becoming brittle and gives it a subtle sheen. The oil also helps the spices adhere better, enhancing flavor. I’ve found that a dry lavash can make the wrap feel like a sandwich rather than a wrap—something I’m not a fan of.
Choose the Right Egg Whites
Fresh egg whites from a large egg will give a better rise and fluffiness compared to powdered egg whites. If you’re using powdered, rehydrate them in water for 10 minutes before whisking. The texture will still be good, but it won’t have the same airy quality. I’ve experimented with both, and the fresh whites always win in terms of mouthfeel.
Creative Twists and Variations
This recipe is a playground. Here are some of my favorite ways to switch things up:
Greek Twist
Swap the feta for a mixture of feta and goat cheese, and add a handful of chopped kalamata olives. The briny olives give a Mediterranean depth, while the goat cheese adds a creamy tang. This version pairs beautifully with a drizzle of lemon‑yogurt sauce.
Spicy Kick
Add a pinch of red pepper flakes to the filling and finish with a dollop of chipotle mayo. The heat balances the richness of the cheese, creating a bold, flavor‑packed wrap. Perfect for those who love a little heat.
Veggie‑Loaded
Introduce sliced bell peppers, shredded carrots, and a handful of arugula. These additions bring crunch and a peppery bite, making the wrap more filling and colorful. The extra veggies also boost the nutritional profile.
Protein Power
Add cooked chicken breast or sliced turkey to the filling for a protein boost. This turns the wrap into a satisfying meal that can stand alone or be paired with a side salad. The lean meat pairs well with the feta and spinach.
Breakfast Edition
Replace the egg whites with a mixture of whole eggs and add sautéed onions and mushrooms. This transforms the wrap into a hearty breakfast option that’s perfect for brunch or a quick post‑workout meal.
Vegan Version
Use a plant‑based mozzarella alternative, vegan feta, and replace egg whites with a chickpea flour batter. The result is a creamy, protein‑rich wrap that satisfies vegans without sacrificing flavor.
Storing and Bringing It Back to Life
Fridge Storage
Wrap each finished wrap tightly in parchment paper and place them in a sealed plastic container. Store in the refrigerator for up to 3 days. The parchment prevents moisture buildup, keeping the lavash from becoming soggy. When you’re ready to eat, let the wrap sit at room temperature for 10 minutes before reheating.
Freezer Friendly
For longer storage, wrap each individual wrap in foil and then place them in a freezer bag. They’ll keep well for up to 2 months. When you want to enjoy one, thaw overnight in the fridge or microwave on low for 2 minutes. The texture may be slightly softer, but the flavor remains intact.
Best Reheating Method
The skillet is the champion for reheating. Preheat the skillet on medium, add a splash of oil, and place the wrap seam‑side down. Heat for 2–3 minutes on each side, or until the lavash is golden and the cheese is melted. If you’re in a hurry, microwave on medium power for 45 seconds, then finish on a skillet for 30 seconds to restore crispness. A tiny splash of water before microwaving keeps the filling from drying out.