Picture this: it’s the night before Halloween, the house is buzzing with the scent of caramelized sugar, and you’re standing in the kitchen, staring at a box of chocolate cake mix that feels like a relic from a past recipe. The previous night, you tried to whip up a classic chocolate cupcake, but the batter ended up lumpy, the frosting stuck to the spoon, and the cupcakes emerged as sad, soggy moons. You laughed, blamed the humidity, and decided to reinvent the wheel. That’s how I discovered the Vampire Bite Halloween Cupcake – a spooky, bite‑sized masterpiece that turns the ordinary into the extraordinary.
The first thing you notice is the deep, glossy sheen of the batter, glimmering like midnight. As you spoon the mixture into liners, the kitchen fills with a sweet, chocolatey perfume that feels like a promise of something wickedly delicious. The sound of the mixer’s blades whirring is a steady heartbeat, and the batter’s texture is silky, a perfect balance between airy and dense. When you pop the cupcakes into the oven, the timer’s ding echoes like a ghostly countdown, and the anticipation builds until the first bite sends a rush of velvety chocolate and a hint of vanilla across your tongue.
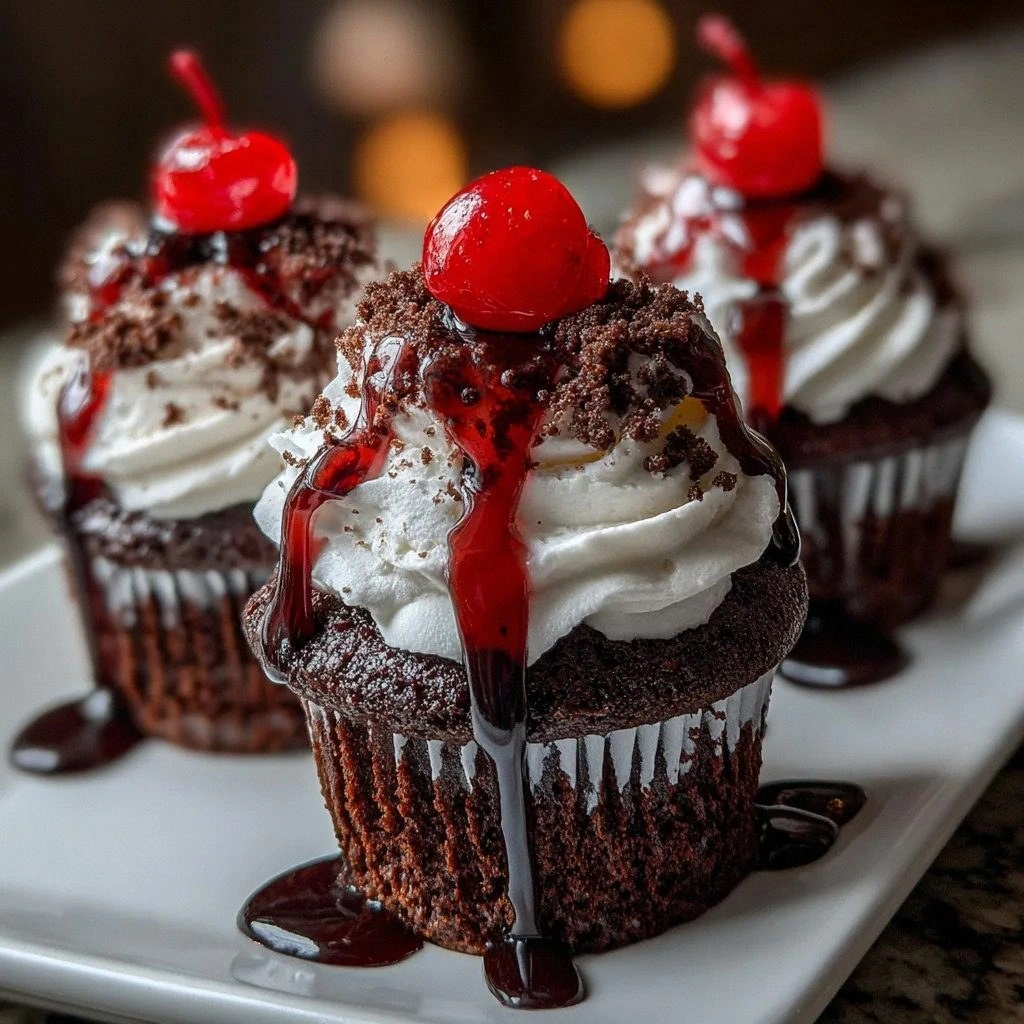
What makes this version stand out is not just the flavor but the theatrics. The crimson “blood” drizzle, the fanged marshmallow toppers, and the glossy chocolate coating create an aesthetic that’s as captivating as it is edible. It’s hands down the best version you’ll ever make at home because it marries taste, texture, and visual impact into one bite. I dare you to taste this and not go back for seconds – the first bite is so addictive it’s almost a sin. And if you’ve ever struggled with cupcakes that fall flat, you’re not alone – this recipe is a cure.
Picture yourself pulling this out of the oven, the whole kitchen smelling incredible, the cupcakes cooling on a rack like miniature moons, each one ready for a bite that feels like a secret kiss. The moment the frosting meets the fanged marshmallow, the sweet meets the spooky, and the chocolate syrup drips like a river of midnight. I’m going to walk you through every single step, from batter to glaze, and by the end, you’ll wonder how you ever made it any other way. Let’s dive in.
What Makes This Version Stand Out
- Flavor: The chocolate base is deep and rich, thanks to a high‑quality cake mix that delivers a velvety bite. The vanilla frosting adds a creamy counterpoint that balances the intensity.
- Texture: The cupcakes rise to a soft, airy center with a slightly crisp outer shell, making each bite a contrast of mouthfeel.
- Simplicity: With only eight ingredients, the recipe is quick to assemble, yet the results feel gourmet.
- Visual Impact: The crimson “blood” swirl and the marshmallow fangs create a dramatic look that’s perfect for Halloween parties.
- Make‑ahead: The cupcakes can be baked and frosted in advance, then stored for up to three days, making them a convenient treat.
- Scalability: The recipe scales easily, so you can make a small batch for a single night or a large one for a crowd.
- Ingredient Quality: Using a reputable chocolate cake mix and a high‑fat vanilla frosting ensures that every bite is indulgent.
- Unique Twist: The addition of red gel food coloring and chocolate syrup adds layers of flavor and a striking visual that sets this apart from traditional cupcakes.
Alright, let's break down exactly what goes into this masterpiece...
Inside the Ingredient List
The Flavor Base
Chocolate cake mix is the heart of this recipe. It provides that deep, chocolatey foundation that makes the cupcakes feel decadent. If you skip it, the cupcakes will taste like plain cake and lose that luxurious bite. For an extra punch, choose a mix with a higher cocoa content or add a teaspoon of espresso powder to intensify the flavor.
The Texture Crew
Large eggs act as the binder that holds everything together, giving the cupcakes a fluffy, airy interior. Water hydrates the flour and helps the batter reach the right consistency; too much water will make it runny, too little will make it dense. Vegetable oil adds moisture, keeping the cupcakes soft and preventing them from drying out during baking. If you’re looking for a vegan version, swap the eggs for a flaxseed “egg” and use a plant‑based oil.
The Unexpected Star
Red gel food coloring is the secret sauce that turns ordinary cupcakes into a Halloween spectacle. It’s powerful enough to give a vivid crimson hue without altering the taste. If you’re worried about the color being too intense, start with a small amount and add more until you reach the desired shade. A small pinch of black food coloring can also be used to deepen the effect for a more authentic blood look.
The Final Flourish
Vanilla frosting is the sweet, creamy layer that ties everything together, adding a smooth contrast to the chocolate base. Chocolate syrup drizzles over the frosting to create a glossy finish that looks like a river of melted chocolate. Mini marshmallows mimic vampire fangs, adding a playful touch and a slight crunch that breaks the monotony of the soft frosting. If you want a more dramatic look, use a flavored frosting like raspberry or dark chocolate.
Everything's prepped? Good. Let's get into the real action...
The Method — Step by Step
- Preheat your oven to 350°F (175°C). Line a muffin tin with 12 paper liners; they’re the stage for your spooky performance. This is the moment of truth, so keep your focus sharp.
- In a large bowl, combine the chocolate cake mix, a pinch of salt, and the eggs. Whisk until the mixture is smooth and free of lumps. The batter should feel silky, like a well‑tempered chocolate mousse.
- Add the water and vegetable oil to the bowl. Stir until the batter is thick but pourable. If it’s too thick, a splash of water will fix it; if too thin, add a tablespoon of flour.
- Fold in the red gel food coloring. Start with a teaspoon, mix thoroughly, then add more if you want a richer hue. The batter should look like a dark, swirling river.
- Fill each paper liner about two-thirds full with the batter. The cupcakes should rise but not overflow. This helps them maintain a clean shape.
- Bake for 18–20 minutes or until a toothpick inserted into the center comes out clean. The edges should pull away slightly from the liners, indicating they’re done.
- Cool the cupcakes on a wire rack for 10 minutes, then transfer them to a tray. While they’re still warm, drizzle chocolate syrup over the tops for a glossy finish. The syrup should soak in and create a shiny glaze.
- Let the cupcakes cool completely before frosting. This prevents the frosting from melting. I’ve seen cupcakes turn into a gooey mess when frosted too early.
- Spread a generous layer of vanilla frosting over each cupcake. The frosting should be thick enough to hold the marshmallows but not so runny that it drips.
- Press mini marshmallows into the frosting, aligning them so they look like fanged mouths. Finish by adding a final drizzle of chocolate syrup for a dramatic, blood‑red finish.
That's it — you did it. But hold on, I've got a few more tricks that'll take this to another level. These insider tips will ensure each bite is flawless and unforgettable.
Insider Tricks for Flawless Results
The Temperature Rule Nobody Follows
Baking at exactly 350°F (175°C) is crucial. If your oven runs hot, the cupcakes will rise too quickly and collapse. Use an oven thermometer to confirm the temperature, and consider using a fanless oven setting if you’re in a hot climate.
Why Your Nose Knows Best
The scent of chocolate baking in the oven is a cue that the cupcakes are nearing perfection. When you smell a faint, sweet aroma, it’s time to pull them out. A strong, buttery scent means they’re overdone.
The 5-Minute Rest That Changes Everything
Letting the cupcakes rest for 5 minutes on the rack after removing them from the oven allows the steam to settle. This step prevents the cupcakes from becoming soggy and gives the frosting a stable surface.
The Frosting Thickener
If your vanilla frosting is too runny, add a tablespoon of powdered sugar or a pinch of cornstarch. This will thicken the mixture, making it easier to pipe or spread without dripping.
The Marshmallow Placement Trick
Press the marshmallows into the frosting at a slight angle to create the illusion of a bite taken. This subtle tilt gives the cupcakes a more realistic fanged look.
The Final Drizzle
Use a squeeze bottle to drizzle chocolate syrup in thin lines over the frosting. This technique gives the cupcakes a glossy, blood‑red sheen that looks professionally finished.
Creative Twists and Variations
This recipe is a playground. Here are some of my favorite ways to switch things up:
Dark Chocolate Decadence
Swap the chocolate cake mix for a dark chocolate version and use dark chocolate frosting. The result is a richer, bittersweet flavor that pairs well with a splash of espresso.
Berry Blood
Add a tablespoon of raspberry puree to the batter for a fruity undertone. Top with a raspberry glaze instead of chocolate syrup for a striking color contrast.
Minty Midnight
Incorporate a few drops of peppermint extract into the batter. Frost with a mint‑infused vanilla frosting and add a sprinkle of crushed candy canes for texture.
Nutty Bite
Fold chopped pecans into the batter for a nutty crunch. Use a walnut butter frosting to complement the chocolate base.
Vegan Vampire
Replace the eggs with flaxseed eggs and use a dairy‑free vanilla frosting. The cupcakes will still rise beautifully and maintain their moist texture.
Glittering Ghouls
Sprinkle edible glitter over the frosting before adding the marshmallows. This adds a sparkling effect that’s perfect for a themed party.
Storing and Bringing It Back to Life
Fridge Storage
Store the cupcakes in an airtight container at room temperature for up to 3 days. If you’re storing them in the fridge, let them come to room temperature before serving to prevent the frosting from hardening.
Freezer Friendly
Wrap each cupcake individually in plastic wrap, then place them in a freezer bag. Freeze for up to 2 months. When ready to enjoy, thaw overnight in the refrigerator.
Best Reheating Method
Reheat frozen cupcakes at 350°F for 8–10 minutes, or until warmed through. Add a tiny splash of water to the batter before freezing to keep the cupcakes moist; this steams back to perfection upon reheating.